|
|
| De: timber (Mensaje original) |
Enviado: 25/09/2019 03:34 |
Abaddon II
Do you love  gothic fonts? I know I do! gothic fonts? I know I do!  This variation of the Abaddon font has spikes which is a perfect font for anything gothic, medieval or Halloween-y. I made a text tag This variation of the Abaddon font has spikes which is a perfect font for anything gothic, medieval or Halloween-y. I made a text tag  , of course, but if you take on this challenge, then feel free to use the font on a sig tag instead. I'm addicted to text tags, don'tchaknow? , of course, but if you take on this challenge, then feel free to use the font on a sig tag instead. I'm addicted to text tags, don'tchaknow? 
I chromed my text and then applied a texture (see details below).

As usual I will give you the settings that I used to create my text. I keep my stroke and fill on separate layers. Foreground/Stroke=1.0, Color= #919191. Background/Fill Color= #000000.
- Create a selection of the text.
- Add an Inner Bevel and then apply Adjust/Brightness and Contrast/Curves. The settings I used are from the Chrome Tutorial by The End of Magic.
- Apply Effects/Texture Effects/Texture (texture=pretty2, 62, 7, 1, 100, 0, #D6D6EA, 315, 30, 32). I got the Pretty2 Texture from Time On My Hands. I just checked and the download link is active.
- Now I move the text selection to the area where I'm going to animate with noise. So while the text is still selected, I offset the selection. You can right-click and drag the selection to move it, but I will explain another way to move a selection. This method uses menu options rather than relying on the movements of the mouse, so I use this method when writing scripts to make my text tags.
- To offset the selected text, go to Selections/Edit (the selection turns a red color and the marquee disappears).
- Go to Effects/Image Effects/Offset (H=4, V=-3, custom, color=black).
- Leave edit mode by going to Selections/Edit again.
- Selections/Invert.
- Selections/Promote Selection to Layer.
- Select None. Now the selected portion of text is on its own layer and I can apply noise, color changes and/or drips.
- Eye Candy 4000 Drip (Bleeding Preset: change maximum length to 95). Change the random seed until the drip effect is pleasing. My EC4K Drip came with the bleeding preset, but if you don't have it and would like the settings, then let me know.
- Add a drop shadow to the fill layer (3, 3, 25, 5, black).
- Animate with Noise (random, 80, mono).
And here's my "bloody" version of the tag  LOL.  All the step are the same except I colorized the Promoted Selection Layer using Adjust/Color Balance/Manual Color Correction (manual target color, hue=13, saturation=85, lightness=23, source= #88F2FE, target= #A46B52).
If you give this font a play, then I would love to see what you create!  |
|
|
|
 Primer
Anterior
2 a 16 de 16
Siguiente
Primer
Anterior
2 a 16 de 16
Siguiente
 Último
|
|
|
|
De: justjam |
Enviado: 25/09/2019 22:40 |
Well, timber I love your results and gave it a shot but, mine doens't look right. LOL.
I am going to try it again. I think I got confused somewhere. Imagine that! 
I would love one of these tags.
I'm going to take a break and go at it again.
|
|
|
|
|
|
De: timber |
Enviado: 25/09/2019 23:06 |
LOL  Judy Judy, it's been so long since I wrote anything that I am a little rusty  . It's good that you got confused, because now you can help me fix my notes so they are easier to understand  . If you could tell me which part confused you then I can explain. In the meantime, here's your finished tag. You didn't specify bloody, so I gave you silver  LOL.  |
|
|
|
|
|
De: justjam |
Enviado: 25/09/2019 23:42 |
OMG timber, I love it.! Thanks so much. 
I tried again and finally got the curve part with the nodes correct but after applying that mine is colorless and when I proceed to step three, I lose the bevel and mine looks like flat gray. 
I'm hopeless! lol I have tried twice but am not through yet. 
I'll be back later if I can get any results. |
|
|
|
|
|
De: justjam |
Enviado: 26/09/2019 01:27 |
Ok finally! I got results I can share. LOL
I had to adjust the texture effects setting to get mine to look silver. I moved the depth higher as well as the intensity.
Thanks for the challenge timber. I might try another font.
|
|
|
|
|
|
De: timber |
Enviado: 26/09/2019 01:41 |
Judy, step #18 of my Gold Bling Text Revised Tutorial has a screenshot to show you what the Curves Preset looks like. BUT I'm thinking you already have the Chrome presets for both the Inner Bevel and for the Curves because I shared those in the supplies for my Billo Disco Love Noisy Trail Tutorial. Check the Presets in your Inner Bevel and Curves filters to see if you already have these saved. Preset_InnerBevel_Chrome Preset_ColorAdjustCurves_Chrome You're very welcome  for the tag! |
|
|
|
|
|
De: timber |
Enviado: 26/09/2019 01:48 |
Here's a screenshot of the Texture settings for you to check against what you used. 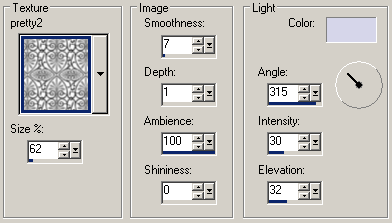 |
|
|
|
|
|
De: timber |
Enviado: 26/09/2019 01:50 |
Did you start with BLACK text for the fill? |
|
|
|
|
|
De: justjam |
Enviado: 26/09/2019 02:11 |
Yes I realized I already had those presets. (I now know from your Billo Disco Noisy Trail Tut.)
On the tut you have at the top of this page for Ambience you have 10 instead of 100.
Maybe that is the difference. Yes, I started with black |
|
|
|
|
|
De: timber |
Enviado: 26/09/2019 02:19 |
Spell check! I think you found the problem, Judy, I'll edit my notes above, thank you!  |
|
|
|
|
|
De: justjam |
Enviado: 26/09/2019 02:20 |
The texture I downloaded is pink. Is that the same as yours? |
|
|
|
|
|
De: timber |
Enviado: 26/09/2019 02:24 |
No. You have to click the LINK that says Pretty Textures. The textures should be monochrome. |
|
|
|
|
|
De: justjam |
Enviado: 26/09/2019 02:55 |
Well I didn't wait long enough. It went to another page that looked like it was not available but I waited and finally it was there. duhh
Well looks like I'll be trying it again. LOL |
|
|
|
|
|
De: timber |
Enviado: 26/09/2019 02:58 |
 Yes, sometimes at the Wayback Machine you have to wait for "crawl time". I'm glad you got the textures. |
|
|
|
|
|
De: justjam |
Enviado: 26/09/2019 03:28 |
Here's my first attempt with the correct settings and texture. LOL I tried the bloody version. 
|
|
|
|
|
|
De: timber |
Enviado: 26/09/2019 03:40 |
 Bloody Judy LOL. I don't think  that's a good nickname  . But I know how you love red , and your tag looks great! You can even experiment with the length of the drips and the thickness. But for the most part the thin drips is less bloodshed  mwahahahah...  |
|
|
Primer
Anterior
2 a 16 de 16
Siguiente
Último
|
 Post Codes
 PSP Challenges
 Taggy Me