|
|
| De: timber (Mensaje original) |
Enviado: 30/01/2009 01:52 |

Click the header to go to the tutorial.
If you have any questions about this tutorial, please ask them on this thread.
And don't forget to show off your results when finished!  |
|
|
|
|
|
|
De: Lightfeather |
Enviado: 07/03/2012 23:55 |
Very cool!!  |
|
|
|
|
|
De: Carolann |
Enviado: 08/03/2012 14:50 |
 Snaggable |
|
|
|
|
|
De: timber |
Enviado: 08/03/2012 18:16 |
Oh, I love that, Annie, thanks for sharing!  It looks like you gelled the clover; it's really pretty!  |
|
|
|
|
|
De: Cheetah |
Enviado: 08/03/2012 19:27 |
timber TYSM for this tutorial - your tag looks soo beautiful - I love the constellation effect and the soft colors .. I created the pattern for the text fill - that's a really nice possibility to make a pattern .. At #13 I got a bit confused b/c I can't change the stroke in PSP7 in this way and I don't understand what would be the effect ?? So I made an text outline (without the pattern fill) under the text layer and applied there the constellation .. #17 is a fantastic advice - I don't have the Offset effect so I made the shadow on a separate layer and moved this layer as you described. Here it is my try - it's not perfect but I am happy   |
|
|
|
|
|
De: timber |
Enviado: 09/03/2012 18:52 |
Ohh, thank you for trying this tutorial and showing your results, Cheetah!  I don't recall if I had a PSP7 person to test this tutorial for me. Clarissa was always the one who would test my tuts for PSP7 but I think she was in school when I wrote this, so it was only tested for PSP8 and newer versions. The way that you have adapted the steps for PSP7 sounds right to me. I have just gone through the steps again to create the text, because I wonder why I wrote it the way that I did. It does seem a bit confusing to write it that way, but I think I know why. When I create a vector text fill layer and center it on the canvas and then create a separate vector stroke layer and center it on the canvas, the two layers do not align properly. So my way of making sure the two layers lined up was to create the first layer with the stroke and then editing it. But looking at the instructions now, it seems a bit cumbersome to get the end results. I noticed when Elaine made her tag that her stroke layer is not aligned with her fill layer. This is the result that I tried to avoid with my cumbersome instructions. But you are experienced enough to know to move your stroke layer a bit to align it properly below the fill layer. I was writing for someone who is inexperienced and I tried to make it easy. But sometimes easy is confusing to someone who knows what they are doing LOL. Thank you very much for your feedback about the confusion with the step! I appreciate it . I am curious to know how you created the fill for your clover. Is that a texture? |
|
|
|
|
|
De: Cheetah |
Enviado: 10/03/2012 12:05 |
okayyyy - now I understand !!! Thanks timber, for explaining - I looked at Clarissas tag - I had the same prob with the layers .. The fill for the clover is from Filters Unlimited -->Paper Textures -->Hemp Paper1 |
|
|
|
|
|
De: timber |
Enviado: 10/03/2012 18:55 |
Thanks for the information about the fill, Cheetah . I have a question for you... This note is from my PSP8 for editing vector text. 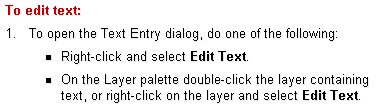 Does this instruction work for PSP7? If not, then can you look in your PSP7 Help menu and look up how to edit vector text? I'm thinking there must be a way for you to edit a vector layer and change the stroke to null while maintaining the fill. I would really like to know if this is possible or not. Thanks in advance! |
|
|
|
|
|
De: Cheetah |
Enviado: 11/03/2012 20:27 |
timber - I am going to do this tutorial once more to find out the exact differences PSP7 vs PSP8 .. Then I'll let you know .. Fingers crossed |
|
|
|
|
|
De: Cheetah |
Enviado: 11/03/2012 22:28 |
 Everything is fine - your tutorial is perfect - thank you soo much for your help #13: Yes, you can edit the vector text layer by right clicking in the layer palette as you described in the tut. The difference in PSP7 is, that the stroke and fill (Foreground and Baclground Material) is separated from the Text toolbar and I can't change the stroke width to zero, only to 1. When I want to change the stroke width to zero I must set the Foreground Material (= stroke color in PSP7) to zero = null ... Really simple, when you know it I am soo happy I did the tut again - here is my results  |
|
|
|
|
|
De: timber |
Enviado: 11/03/2012 22:59 |
You're very welcome for the help!  I used to include the different instructions between PSP7 and the newer versions, but those instructions are in the tutorials in my Beginner section. I took lots of time and included as much detail as I could in those tutorials. But that kind of writing is so time consuming that I decided to leave that info out when I write for the Advanced tutorials. Thanks for reminding me about the difference between stroke=null and stroke=0. Thanks for trying the tutorial again and posting your results! Your tag is lovely, as usual  .  |
|
|
|
|
| I have given this tut a try and here are my results ♥ For the heart, I used MF Love Dings letter "X" at 300pt.
I used dsb flux: Bright Noise, 35
I used Noise, 50 |
|
|
|
|
|
De: timber |
Enviado: 25/05/2020 06:47 |
 Beautiful work, Karla, thanks so much for trying the tutorial and showing your results! |
|
|
|
|
Thanks Timber for this tut the tutorial you wrote was excellant and easy to follow..
I will enjoy using this tut for other things.. Thank you |
|
|
|
|
| Thank you, Timber!! ♥
Nice work, Daphne!! ♥ |
|
|
|
|
|
De: timber |
Enviado: 27/05/2020 21:01 |
 Awesome work, Daphne!  I'm so happy to hear that the tutorial was easy for you to follow. Thanks for showing your results, I enjoyed seeing them. |
|
|
 Primer
Anterior
44 a 58 de 58
Siguiente Primer
Anterior
44 a 58 de 58
Siguiente
 Último
|
 Post Codes
 PSP Challenges