Hey ya'll! I have one more Valentine inspired tutorial for the week. Yay! Since I've been able to wear my hair down at work now I'm completely infatuated with hair clips again and wanted to make something to wear around the holiday since you can guarantee that I will be at work...selling tons (and tons) of roses.
I love doilies. They seem so pretty, dainty and "romantic" to me. They are perfect for prettying up your locks for Valentine's day. So here's what you'll need:
Felt
eyelet lace
a small doily
scissors
a marker
thread to match your doily and felt
one large bead
glue gun
pins
sewing needle
2 hair clips (1 that is flat and will fit and clip within the "holes" of the doily -see photos below)
brooch clip (optional)
Start out by laying your doily onto your felt. Take your pin and mark the circle part of the doily (see next photo for reference). Cut out the circle.
Pin this to your doily and with thread to match, sew the felt onto the back. (I recommend sewing because doilies are normally lacy and you would be able to see hot glue from the front side, blah.) Do not sew the middle of the doily to the felt if you want to use the 2 hair clips together! It will not work...promise!
Before doing this consider how you want to attach your hair clip. Mine is large and thin so it was necessary to cut a small slit in the middle of the felt and tack it down along with the ends to keep it from sliding around. You can also hot glue it right onto the felt. If you can find these hair clips (at Walmart or Target) get a pack...they are gentle on your locks and are large enough that you can slide it onto your jacket or top for an easy brooch. (Also attach brooch clip to back of felt now if you want.)
Part 1 of this hair clip is complete. Easy peasy. I love how the red peeks through the doily. So pretty. It would look lovely with velvet too!!
Now for the 2nd part...cut 10 inches of your eyelet lace. Mine is vintage but you can find this at your local craft/sewing store like Joanns. Using your needle and thread, or machine, do a long running stitch and begin to gather the lace.
Pull the thread until you have a rosette and knot it, without cutting. Sew here and there throughout all layers of the rosette to hold it all together.
Cut out a small circle of felt to match your lace and do the same as above with your hair clip...either cut small slits in the middle (glue or sew into place) or hot glue it directly onto the felt.
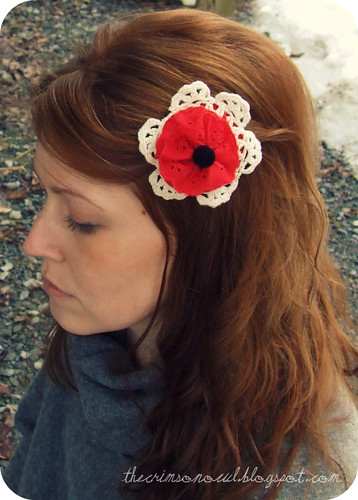
Glue your rosette onto your felt/hair clip and glue a bead into the center. I like that makes me think of a poppy. ;)
Now you have two cute little hair clips to rock seperately or...
simply slide the clip of the "poppy" across the "holes" in the doily, clip and wear together!!
http://thecrimsonowl.blogspot.com/2011/02/2-n-1-doily-hair-clip-tutorial-diy.html?utm_source=feedburner&utm_medium=feed&utm_campaign=Feed:+blogspot/kQPG+(The+Crimson+Owl)