| De: timber (Mensaje original) |
Enviado: 26/01/2021 01:21 |

I have been making tags with animated motion trails for some years now, but I've never shown how I do it. This tutorial will fill a font with an animation commonly referred to as a floatie and add an animated motion trail. It will not teach you how to create a motion trail tag using a different floatie, but perhaps you can look at the layers of the pspimage that I share in the supplies and the steps of the script to give you an idea of how the process works. You can always ask questions in this thread if you're interested in learning how to do that.
This tag can be made with a variety of colors. I created a palette from the animation so there are 6 colors to choose from. The tutorial header uses the blue palette. You can also create additional palettes by overlaying one palette atop another and reducing the opacity of the top palette to 50%.
This tutorial is written mostly in my own notes and not as a formal tutorial, so you will need a comfortable working knowledge of your PSP tools, layers, palettes, etc. I will include some menu paths and screenshots, but not many. Since I make multiple tags for tag offers, I create a script to make my tag making faster, so I will provide that script for you. You should be comfortable using scripts before trying this. As always if you run into any trouble, then just ask  . . |
For this tutorial, you will need:
Paint Shop Pro (version 8 or higher)
Animation Shop
Eye Candy 4000 (or Eye Candy 3) Glass and Motion Trail
Supplies here:
Melody MakerNotes Only Font: open and minimize
tbt-MelodyMusicText-script: place in the Scripts-Restricted folder
tbt-MelodyMusicText-EC3-script: place in the Scripts-Restricted folder
tbt-MelodyMusicText-layers: open in PSP
Netmarble's Music Symbols "Floatie" Animation |
TEXT TOOL: Create as vector, Melody MakerNotes Only, size=90, stroke=0
MATERIALS: BGcolor=#000000
Note: Complete the steps as indicated except for the steps between ~RUN SCRIPT and ~END SCRIPT. Those steps are run by the script, so you will ignore those if you're running the script. You will pick up again after ~END SCRIPT and complete any tutorial steps.
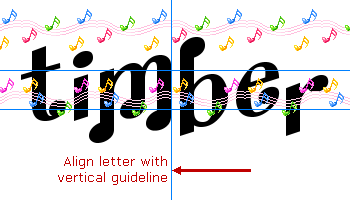
- view/guides;
- text layer; type text; center on canvas;
- the two horizontal guidelines indicate the space where the music notes will appear, so move text vertically to sit between the two horizontal guidelines; move text horizontally so one letter is touching the vertical guideline;
- unhide palette layer; set materials for color of your choice (FGcolor, BGcolor; FGmaterial=gradient (foreground-background); hide palette layer;
~RUN SCRIPT: tbt-MelodyMusicText-script
Note: Run tbt-MelodyMusicText-EC3-script if you're using Eye Candy 3.
- create selection from vector; convert to raster layer; save selection to alpha; bevel (bevel#2, 15,21,7,0,40,white,49,34,55); bevel again with width=5; ec4k glass (melted candle preset); invert selection;
- delete selection on layers 1-7; invert selection;
- outline layer; expand selection by 4; fill with gradient; load selection from alpha; expand by 2; float; cutout (1,1,75,1,white,fill UNchecked); defloat; shadow: 1,1,25,1,black; load selection from alpha; shadow again; select none; duplicate;
- layer properties (name=gradient trail); send to bottom; ec4k motion trail (direction=204,20,0,100, none checked); duplicate;
- copyofgradienttrail layer; select all-float-defloat; layers/delete; invert selection;
- delete selection on toadies trail layers 1-7; select none; set blendmode to hue (for all 7 toadies trail layers);
- unhide 1toadiestrail layer;
- load selection from alpha channel; expand selection by 4; layers/new adjustment layer/curves (input=50); bring to top; select none;
- watermark layer;
~END SCRIPT
- place watermark; hide background;
- crop;
Optional: Depending on your preference you may want to delete the music symbols that appear at the top and/or bottom of the letters. I find them to be distracting from the flow of music symbols through the middle of the text, so I delete them.
- unhide layers 2-7;
- draw selection rectangle around areas of letters to delete;
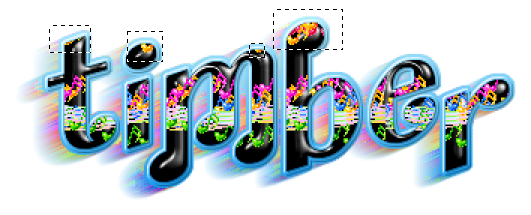
- delete selection on layers 1-7; select none;
- hide layers 2-7;
- copymerged;
|
Animate the Text
- in AS, paste as new animation (F1);
- back in PSP, hide 1toadiestrail layer, unhide 2toadies trail layer; hide 1 layer; unhide 2 layer; copymerged; in AS, paste after current frame (F2);
- back in PSP, hide 2toadiestrail layer, unhide 3toadies trail layer; hide 2 layer; unhide 3 layer; copymerged; in AS, paste after current frame (F3);
- back in PSP, hide 3toadiestrail layer, unhide 4toadies trail layer; hide 3 layer; unhide 4 layer; copymerged; in AS, paste after current frame (F4);
- back in PSP, hide 4toadiestrail layer, unhide 5toadies trail layer; hide 4 layer; unhide 5 layer; copymerged; in AS, paste after current frame (F5);
- back in PSP, hide 5toadiestrail layer, unhide 6toadies trail layer; hide 5 layer; unhide 6 layer; copymerged; in AS, paste after current frame (F6);
- back in PSP, hide 6toadiestrail layer, unhide 7toadies trail layer; hide 6 layer; unhide 7 layer; copymerged; in AS, paste after current frame (F7);
- set display time to 18; view animation;
- save as median cut, error diffusion
 |
Variations
For this tag, I used the purple color palette. I added some extra sheen to the text by adding an extra black text layer above my text layer that I "chromed" using TEOM's Chrome Tutorial. I set the blendmode=overlay of the chrome layer.

For this tag, I used FGcolor=#9688F4 and BGcolor=#DCE2FF. These colors come from adding the blue palette atop the purple palette and reducing the opacity of the top palette to 50%. I created the "black latex" look by adding a chrome layer like my sample above but I used these settings for the Curves filter.

You may offer your results wherever you wish, but you may not sell for profit.
This tutorial was written by timber on January 25, 2021. |
|
|
 Post Codes
 PSP Challenges
 Smileys