
You may print this out for your own personal use, but please do not rewrite, translate, e-mail out, offer any part of this on any other site, add to a CD, or claim this as your own. Your finished result is yours to do with as you please, including making tags and/or snags for others. You may offer your results wherever you wish, but you may not sell for profit. This tutorial was written by timber on May 31, 2008.
I wrote this tutorial using PSP8 and Animation Shop 3.10. Although I have included as many screenshots and details to make this tutorial easier for beginners, some basic knowledge of PSP and Animation Shop would be helpful. Unless I say otherwise, all 'clicks' are with the left mouse button. I have included keyboard shortcuts for the steps in parentheses ( ). This tutorial is a revision of my original Gold Bling Text Tutorial. I had to rewrite it, because the sites that provided the supplies for download were no longer available.
For this tutorial, you will need:
Paint Shop Pro
Animation Shop
AC3-Hearts2 font
Diamond Pattern
DSB Flux Bright Noise (optional)
Supplies (optional):
Layered PSP File¹
Curves Preset²
Notes: ¹The layered PSP file is a 400x200 canvas with all the layers added and named for you. You don't need this file to complete the tutorial (I will include the steps for adding these layers below), but I've included it in the supplies to save you those steps. ²The Curves Preset is also provided as a convenience; the tutorial can be completed without it. |
1. Extract the Preset_ColorAdjustCurves_Chrome.PspScript (from the supplies)
to your Presets folder. The Curves Preset will not work for PSP7 users, so just disregard it
(you will be given instructions for completing this step of the tutorial).
Open PSP and Animation Shop (AS).
Open the font and minimize it to the taskbar.
In PSP, open the diamond pattern (tbt-diamond.gif) and minimize. |
| Prepare the Canvas |
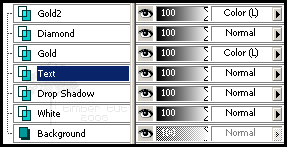
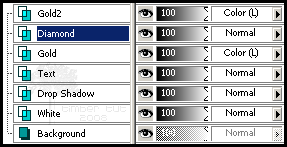
2. If you're using the layered PSP file from the supplies (GBTRTut_Layers.pspimage), open it, then skip to step #8 here. If you're not, then let's take a moment to add the needed layers to the canvas.
Create a new image  (canvas) 400x200 with a white background. (canvas) 400x200 with a white background.
File > New (Ctrl+N) |
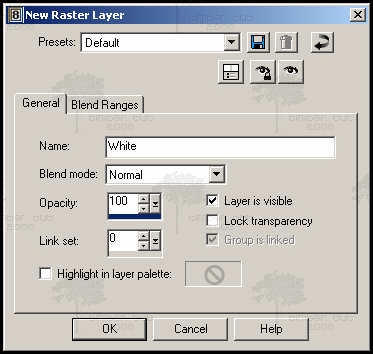 |
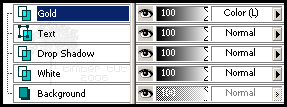
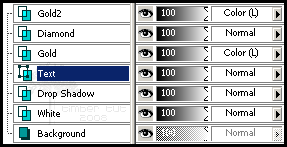
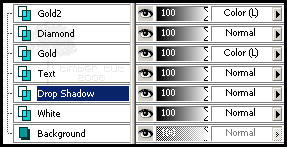
3. Add a New Raster Layer  and name it White. and name it White.
Layers > New Raster Layer

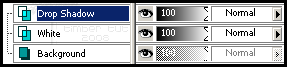
Add another New Raster Layer and name it Drop Shadow.
 |
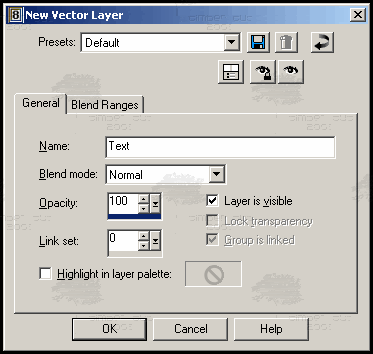 |
4. Add a New Vector Layer  and name it Text. and name it Text.
Layers > New Vector Layer
 |
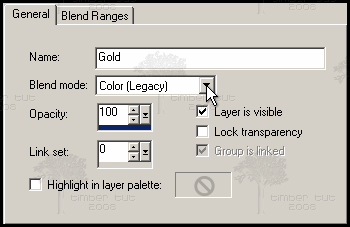 |
5. Add a New Raster Layer , name it Gold, and set the Blend Mode to Color (Legacy).
If you're using PSP7, set the Blend Mode to Color.
 |
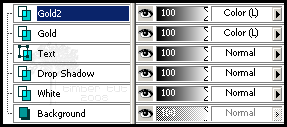 |
6. Duplicate  Gold. Gold.
Layers > Duplicate
Rename the duplicate layer "Gold2". |
 |
7. Finally, add a New Raster Layer , name it Diamond, and move it down  (between the two gold layers). (between the two gold layers).
Layers > Arrange > Move Down |
| Create the Text |
8. Load the Text Tool  (T) and apply these settings* (all other settings on the toolbar should be default settings). (T) and apply these settings* (all other settings on the toolbar should be default settings).

*If you're using PSP 10/11/12, your text size is rendered differently than mine, so instead of using size 48, try size 64. |
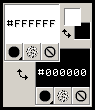 |
9. On the Materials palette, set the Foreground Color to #FFFFFF (white) and the Background Color to #000000 (black). |

If your text is wider than your canvas, just resize your canvas  (increase the width as necessary). (increase the width as necessary).
Image > Canvas Size
Or if you prefer, you can decrease the text size until your text fits on the canvas. |
10. Make Text active.
Click on the canvas, type your text into the Text Entry box, adjust the kerning if necessary, and then click Apply.
For letters with outlined hearts, type uppercase letters (lowercase letters will be plain text).
Center the text on the canvas  . .
Objects > Align > Center on Canvas |
 |
11. Select the vector text  and Convert it to a raster layer and Convert it to a raster layer  . .
Selections > From Vector Object (Ctrl+Shift+B)
Layers > Convert to Raster Layer |
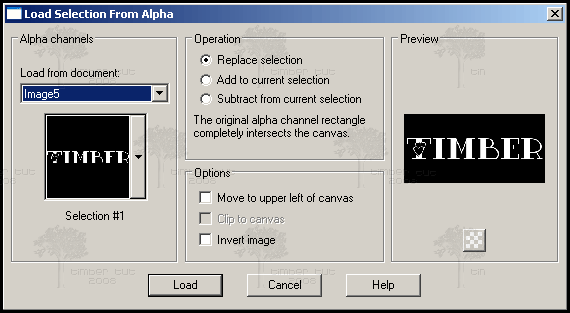
12. Save the selection to an Alpha Channel  . .
Selections > Load/Save Selection > Save Selection To Alpha Channel
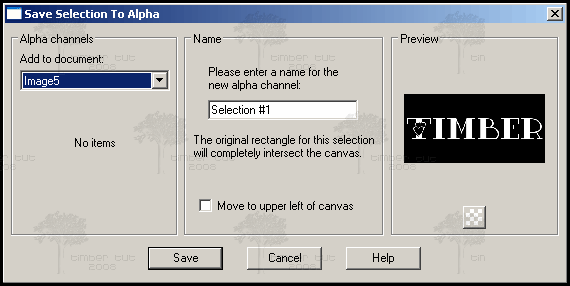
The document name will be the name of your working canvas, and may or may not be Image5 as mine is.
Selection #1 is the default name of the selection. Click Save (to save the selection). |
 |
13. Make Drop Shadow active.
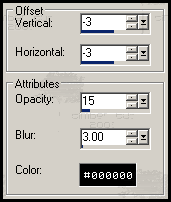
Apply these Drop Shadow  settings. settings.
 |
 |
14. Make White active.
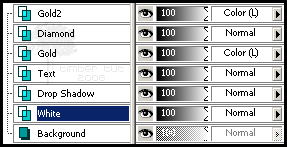
Expand the selection  by 1 pixel. by 1 pixel.
Selections > Modify > Expand |
15. Load the Flood Fill Tool  (F) and apply these settings. (F) and apply these settings.
 |
|
16. Flood Fill the selection with the Foreground Color. |
17. Make Text Active.
Apply these Inner Bevel  settings. settings.
Effects >3D Effects > Inner Bevel
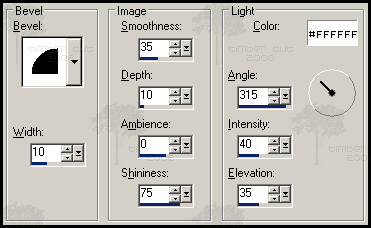
 |
Default
Finished |
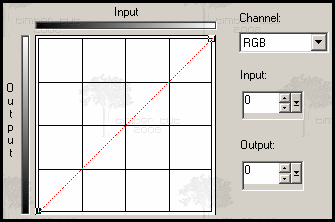
18. Adjust the brightness using the Curves  filter. filter.
Adjust > Brightness and Contrast > Curves
Colors > Adjust > Curves [for PSP7 users]
If you have the Curves Preset from the supplies, select Chrome from the drop-down menu  and click OK. Skip to step #19. and click OK. Skip to step #19.
If you don't have the Curves Preset, press the Reset to Default  button. button.
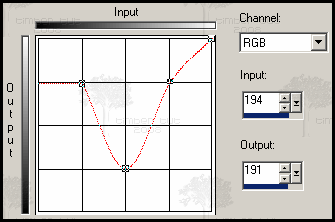
Now edit the position of the first point on the graph by changing the Input/Output values to 64/189.
Then add a 2nd and a 3rd point to the graph at these positions:
(2nd) Input: 128, Output: 63
(3rd) Input: 194, Output: 191
To add a point to the graph, move the cursor over the dotted red line until the cursor changes to an arrowhead and displays “+ADD,” then click the line. To move the line, enter values in the Input and Output edit boxes.
Leave the 4th point on the graph at 255/255. Click OK. |
 |
19. Make Gold active.
 |
20. The Flood Fill Tool (F) should still be loaded. If it's not, then load it.
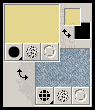
Copy this color palette and Paste into PSP as a New Image  (Ctrl+V). (Ctrl+V).
You can save it to your computer for future use if you like.
You can use this color palette (or another color of your choice) to colorize your text.
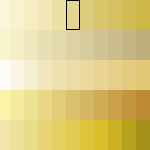
I'll be using the color inside the black rectangle (#E4D58F) for my example.
Set the Foreground Color with a color from the color palette by holding down
the Ctrl key (the cursor will change to a dropper  ), ),
positioning the cursor over a color, and clicking to select.
Flood Fill the selection with the foreground color.
 |
21. Make Diamond active.
Load Selection #1 from the Alpha Channel  . .
Selections > Load/Save Selection > Load Selection From Alpha Channel
Contract the selection  by 3 pixels. by 3 pixels.
Selections > Modify > Contract
For smaller font sizes, only contract by 2 pixels.
 |
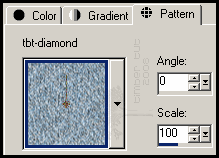 |
22. On the Materials palette, set the Background Style to Pattern  . Load the tbt-diamond pattern and apply these settings (on the left). . Load the tbt-diamond pattern and apply these settings (on the left).
I'm using Angle=0, but you could also use angles 90, 180, and 270. With any other angle, the diamond pattern will be blurry.
 |
 |
23. Flood Fill the selection with the background pattern. |
| Continue to Page 2 |
 Post Codes
 PSP Challenges
 Smileys
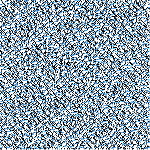