
You may print this out for your own personal use, but please do not rewrite, translate, e-mail out, offer any part of this on any other site, add to a CD, or claim this as your own. Your finished result is yours to do with as you please, including making tags and/or snags for others. You may offer your results wherever you wish, but you may not sell for profit. This tutorial was written by timber on December 9, 2007.
I wrote this tutorial using PSP8 and Animation Shop 3.10. Although I have included as many screenshots and details to make this tutorial easier for beginners, some basic knowledge of PSP and Animation Shop would be helpful. Unless I say otherwise, all 'clicks' are with the left mouse button. I have included keyboard shortcuts for the steps in parentheses ( ).
For this tutorial, you will need:
Paint Shop Pro
Animation Shop
SuperBladePro
Meadows Studio Coconut Ice SBP Preset
Carnivale Font
Supplies:
My Stripe Pattern
which I created using Suz's Place Making Stripes Script |
1. Extract the three Coconut Ice files (M_white_texture, M_white_pic, M_coconutice.q5q) to the Environments and Textures folder of your SuperBladePro folder.
Open PSP and Animation Shop (AS).
In PSP, open the tbt_candystripe.png pattern (or another pattern of your choice).
Open the font and minimize it to the taskbar. |
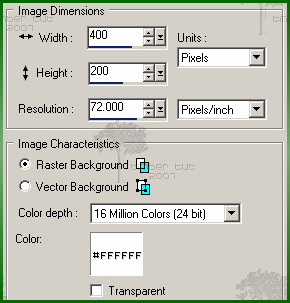
2. Create a new image  400x200 with a white background. 400x200 with a white background.
File > New (Ctrl+N)
screenshot |
3. Load the Text Tool  (T) and apply these settings* (all other settings on the toolbar should be default settings). (T) and apply these settings* (all other settings on the toolbar should be default settings).

*If you're using PSP 10/11/12, your text size is rendered differently than mine, so instead of using size 72, try size 96.
I've used stroke=1.7 for the tut header above (and for my screenshots).
For a thinner outline, change the stroke to a value between 1.0-1.6.
For a thicker outline, change the stroke to a value between 1.8-2.0. |
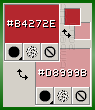 |
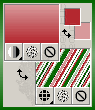
4. On the Materials palette, set the Foreground Color to #B4272E and the Background Color to #D8999B.
If you're not using my pattern, then choose a medium-dark color from your pattern for the Foreground Color and a light color for the Background Color. |
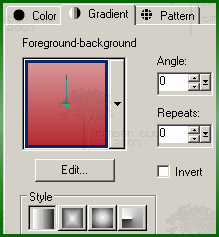 |
5. On the Materials palette, set the Foreground Style to Gradient  . Load the Foreground-background gradient and apply these settings. . Load the Foreground-background gradient and apply these settings.
 |
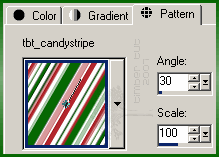 |
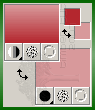
6. On the Materials palette, set the Background Style to Pattern  . Load the tbt_candystripe pattern and apply these settings. . Load the tbt_candystripe pattern and apply these settings.
 |

This canvas size will accommodate most names (if you're making a siggy) with six (6) letters or less, but if your name or text is wider than this canvas, then increase the width of the canvas (keep the placement in the center).
Image > Canvas Size
screenshot |
7. Click on the canvas, type your text into the Text Entry box, and click Apply.
Center the text on the canvas  . .
Objects > Align > Center on Canvas
As you can see, the pattern changed it's angle, so we need to reset it. |
 |
8. Right-click on the canvas and choose Edit Text  (the Text Entry dialog box opens). (the Text Entry dialog box opens).
On the Materials palette, click on the Background Material box and reset the angle of the pattern to 30. Click Apply. |
 |
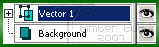
9. Select Vector 1  and convert it to a raster layer and convert it to a raster layer  . .
Selections > From Vector Object (Ctrl+Shift+B)
Layers > Convert to Raster Layer
 |
 |
10. Contract the selection  by 2 pixels. by 2 pixels.
Selections > Modify > Contract |
 |
11. Apply the SuperBladePro Coconut Ice preset.
Effects > Plugins > Flaming Pear > SuperBladePro
Click the Open Settings button  and choose M_coconutice.q5q from the list of presets. Click Open. Click OK. and choose M_coconutice.q5q from the list of presets. Click Open. Click OK. |
 |
12. Sharpen  . .
Adjust > Sharpness > Sharpen |
|
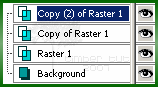
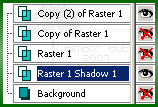
13. Duplicate  this layer twice. this layer twice.
Layers > Duplicate
Layers > Duplicate
 |
 |
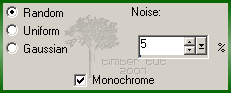
14. Apply these Noise  settings. settings.
 |
 |
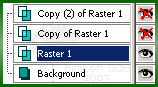
15. Hide  Copy (2) of Raster 1. Copy (2) of Raster 1.
Make Copy of Raster 1 active.
Apply the same Noise settings from step #14. |
 |
16. Hide Copy of Raster 1.
Make Raster 1 active.
Apply the same Noise settings from step #14.
Deselect  . .
Selections > Select None (Ctrl+D) |
 |
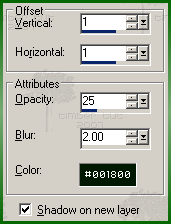
17. Apply these Drop Shadow  settings (color=#001800). settings (color=#001800).
Effects > 3D Effects > Drop Shadow
 |
 |
18. Hide Background.
 |
19. Copy the merged  image. image.
Edit > Copy Merged (Ctrl+Shift+C)
In AS, paste as a new animation  . .
Edit > Paste > As New Animation (Ctrl+V)
 |
 |
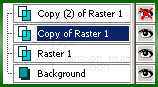
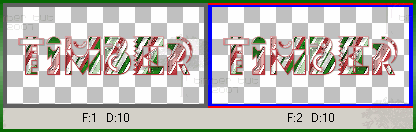
20. Back in PSP, hide Raster 1 and unhide  Copy of Raster 1. Copy of Raster 1.
 |
21. Copy the merged image.
Edit > Copy Merged (Ctrl+Shift+C)
In AS, paste after the current frame  . .
Edit > Paste > After Current Frame (Shift+Ctrl+L)
(Screenshot not actual size) |
 |
22. Back in PSP, hide Copy of Raster 1 and unhide Copy (2) of Raster 1.
 |
23. Copy the merged image.
In AS, paste after the current frame .
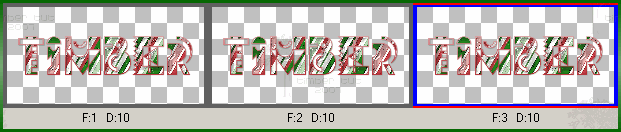
(Screenshot not actual size) |
| Crop and Save the Animation |
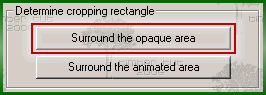
24. Crop the animation by double-clicking on the Crop icon on the Tool Palette.

Choose "Surround the opaque area" and click OK.

(Screenshot not actual size) |
25. Double-click within the crop square to crop (or press the Crop button).

(Screenshot showing only Frame 1 of 3 frames) |
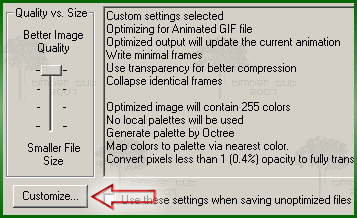
26. Save the animation  . .
File > Save (Ctrl+S)
Click on the Customize button.
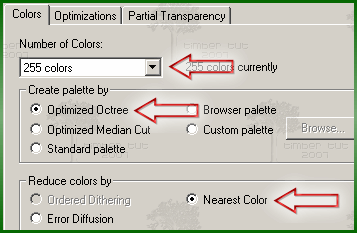
Click on the Colors tab and apply these settings.
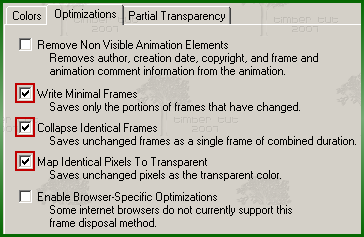
Click on the Optimizations tab and apply these settings.
Click on the Partial Transparency tab and apply these settings.
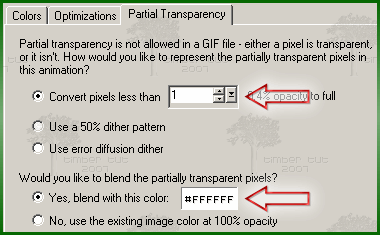
Click OK.
Click Next.
Click Next.
Click Next.
Click Finish.
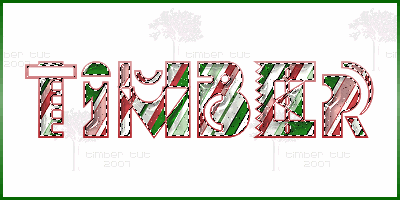
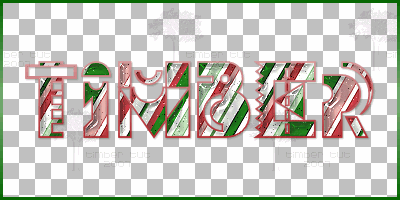
YOU'RE DONE!!!
 |
Variations
For a different look, try these various pattern-changing techniques. |
 |
For this example, I mirrored  (Ctrl+M) the stripe pattern before loading it as the background pattern. And I changed the angle of the pattern to 37. (Ctrl+M) the stripe pattern before loading it as the background pattern. And I changed the angle of the pattern to 37. |
 |
For this example, I converted the text to curves as character shapes  . .
After editing your text in step #7 (and before selecting and converting your text in step #8), right-click on the canvas, choose Convert Text to Curves>As Character Shapes. All other tutorial steps are the same. |
 |
For this example, I changed the angle of the pattern to 180. |
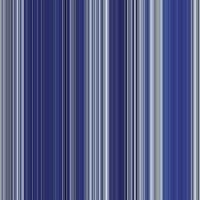
For this next example, I first created a stripe pattern from a snowflake background using the Making Stripes script from Suz's Place.
I zoomed in and looked for a section of stripes that I wanted to use for my stripe pattern and selected it with the Selection Tool  (S). (S).
Then I loaded the Crop Tool  (R) and cropped to the current selection (R) and cropped to the current selection  . .
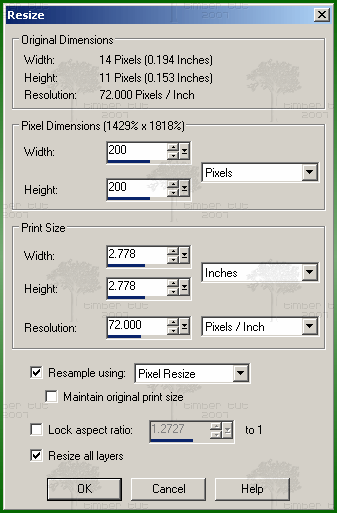
Then I took the cropped bit and resized  it to 200x200. it to 200x200.

 I picked two colors from the pattern for the foreground and background colors. I picked two colors from the pattern for the foreground and background colors.
I set the pattern angle to 0.
These stripes were rather dark and dull, so to brighten them, I duplicated my Raster Layer after step #9 and changed the blend mode (of the duplicate layer) to Overlay. Then I made Raster 1 active and continued with the tutorial at step #10.
For the drop shadow, I picked a dark blue color from the image.
All other steps are the same as the tutorial.
 |
I'd love to see your results!
You can post them with the other member results
HERE |
 Post Codes
 PSP Challenges
 Smileys
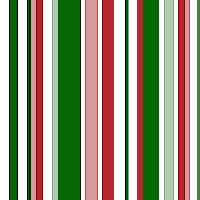