
You may print this out for your own personal use, but please do not rewrite, translate, e-mail out, offer any part of this on any other site, add to a CD, or claim this as your own. Your finished result is yours to do with as you please, including making tags and/or snags for others. You may offer your results wherever you wish, but you may not sell for profit. This tutorial was written by timber on January 22, 2007.
I wrote this tutorial using PSP8 and Animation Shop 3.10. Although I have included as many screenshots and details to make this tutorial easier for beginners, some basic knowledge of PSP and Animation Shop would be helpful. Unless I say otherwise, all 'clicks' are with the left mouse button. I have included keyboard shortcuts for the steps in parentheses ( ). The Colorful Lens pattern was included with my PSP8 software, and the candle flame animation was created by me using the Fire tubes that came with my software.
For this tutorial, you will need:
Paint Shop Pro
Animation Shop
Eye Candy 4000
Black Rose font
Supplies:
Colorful Lens pattern
Candle Flame animation |
1. Open PSP and Animation Shop (AS).
Open the Colorful Lens pattern in PSP and then minimize.
Open the flame animation in AS.
Open your font and minimize it to the taskbar. |
2. In PSP, create a new image  (canvas) 400x200 with a white background. (canvas) 400x200 with a white background.
File > New (Ctrl+N)
screenshot |
3. Load the Text Tool  (T) and apply these settings* (T) and apply these settings*
(all other settings on the toolbar should be default settings).

*If you're using PSP 10/11/12, your text size is rendered differently than mine, so instead of using size 72, try size 96. |
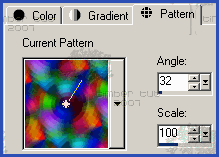 |
4. On the Materials palette, click the Background Color box. Load the Colorful Lens pattern and apply these settings.
To load the Colorful Lens pattern, click the Pattern tab. Click the Pattern Type drop-down list (▼) and select the Colorful Lens pattern from the list of patterns (it should be towards the top of the list).
Change the angle to produce different color patterns. Reduce the Scale for more colors (50 works well for this). |
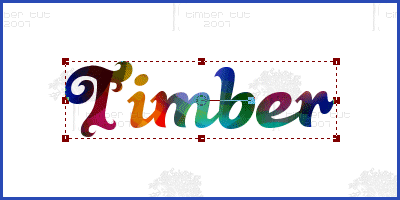
5. Click on the canvas, type your text into the Text Entry box, and click Apply.
Center the text on the canvas  . .
Objects > Align > Center on Canvas
 |
6. Select the vector text  and convert it to a raster layer and convert it to a raster layer  . .
Selections > From Vector Object (Ctrl+Shift+B)
Layers > Convert to Raster Layer
Apply a Gaussian Blur  , Radius=1. , Radius=1.
Adjust > Blur > Gaussian Blur
 |
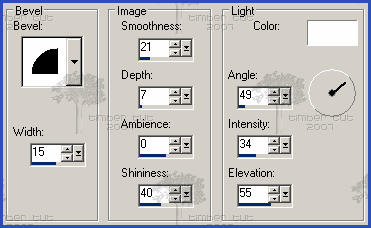
7. Apply these Inner Bevel  settings. settings.
Effects >3D Effects > Inner Bevel
 |
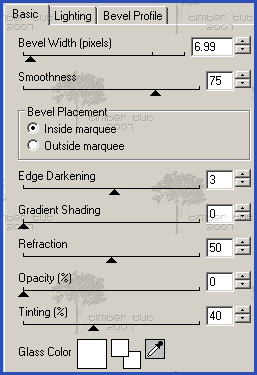
8. Apply these Eye Candy 4000 Glass settings.
Effects > Plugins > Eye Candy 4000 > Glass
First reset all tab settings to factory default.
Settings > Reset to factory default (F5)
Then apply these settings to the Basic tab.
 |
9. Apply these Eye Candy 4000 Drip settings.
Effects > Plugins > Eye Candy 4000 > Drip
First press F5 to reset all tab settings to factory defaults,
then apply these settings to the Basic tab.

Press the Random Seed button until you are satisfied with the drip effect.
The Random Seed in my example is 111. Increase the Width for thicker drips.
Deselect  . .
Selections > Select None (Ctrl+D)
 |
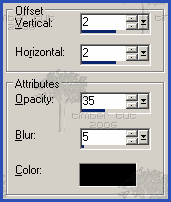
10. Apply these Drop Shadow  settings. settings.
Effects > 3D Effects > Drop Shadow
If you don't want an animated tag, you could crop your tag at this point and save as a jpeg. |
 |
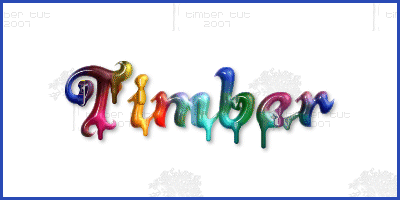
11. Hide the Background layer by clicking on the eye symbol next to the layer.
If you would like your tag on a white background, omit this step. |
12. Copy the merged file  . .
Edit > Copy Merged (Ctrl+Shift+C)
In AS, paste as a new animation  . .
Edit > Paste > As New Animation (Ctrl+V)
 |
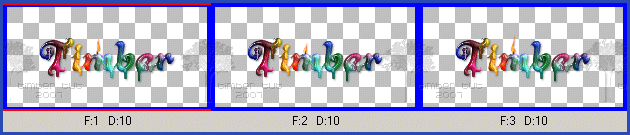
13. Duplicate  this frame twice and select all this frame twice and select all  the frames. the frames.
Edit > Duplicate Selected
Edit > Duplicate Selected
Edit > Select All (Ctrl+A)
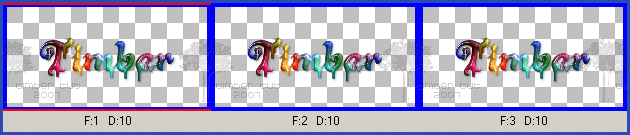
(screenshot not actual size) |
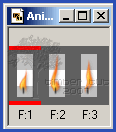
14. Select all the frames of the candle flame animation and copy  them. them.
Edit > Select All (Ctrl+A)
Edit > Copy (Ctrl+C)
 |
15. Pick a letter in your text animation to add the flame to and zoom in (move the slider buttons on the vertical and horizontal scroll bars until your letter is in center view.
Paste the frames of the flame into the frames of the text  . .
Edit > Paste > Into Selected Frame (Ctrl+E)
Position the candle wick (so it's centered on the letter) and click to paste (the frames of the flame will hover with your mouse pointer until you have clicked into the frame of your text).

 |
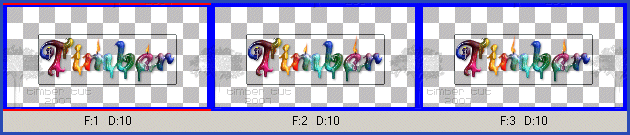
16. To add a second flame to your text, just repeat step 15.
If you don't want your flames to appear identical, then using your Arrow  Tool, click F:1 of the flame animation to highlight it. Now click and drag F:1 to the position shown in the screenshot and release the mouse button. Tool, click F:1 of the flame animation to highlight it. Now click and drag F:1 to the position shown in the screenshot and release the mouse button.
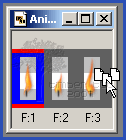
F:1 becomes F:3.
Now repeat steps 14 and 15 to add the second flame to your text.
 |
17. Crop your animation by double-clicking on the Crop icon on the Tool Palette.

Choose "Surround the opaque area" and click OK.
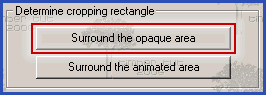
If your tag has a white background, then load the Crop Tool (by clicking on the Crop icon). Click and drag on your animation to form a square around your text. |
18. Double-click within the crop square to crop (or press the Crop button).
 |
19. Adjust the timing of all the frames  . .
Animation > Frame Properties (Alt+Enter)

Now click F:2 and change the display time to 25.
 |
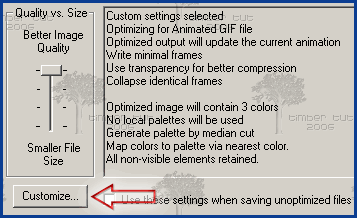
20. Save your animation  . .
File > Save (Ctrl+S)
Click on the Customize button.
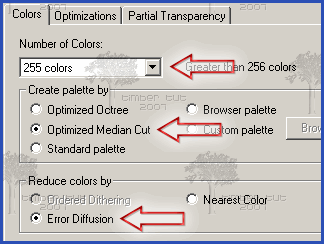
Click on the Colors tab and apply these settings.
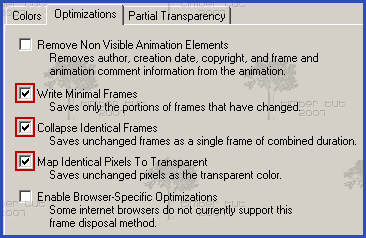
Click on the Optimizations tab and apply these settings.
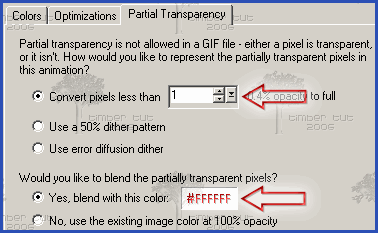
Click on the Partial Transparency tab and apply these settings.
Click OK.
Click Next.
Click Next.
Click Next.
Click Finish.
YOU'RE DONE!!!
 |
Here's an example of a non-animated tag saved as a JPEG with these tut settings: Pattern (Angle=168, Scale=50), Gaussian Blur (Radius=0.75), Drip filter (Width=7.88, Random Seed=482).

See Member Results Here |
 Post Codes
 PSP Challenges
 Smileys