
You may print this out for your own personal use, but please do not rewrite, translate, e-mail out, offer any part of this on any other site, add to a CD, or claim this as your own. Your finished result is yours to do with as you please, including making tags and/or snags for others. You may offer your results wherever you wish, but you may not sell for profit. This tutorial was written by timber on October 14, 2008.
I wrote this tutorial using PSP8 and Animation Shop 3.10. For this tutorial, I am going to deviate from my normal style of tutorial writing which includes lots of screenshots and details (if a screenshot or more details are needed for any particular step, then let me know, and I will add them). To complete this tutorial, you should have a comfortable working knowledge of the Tools, Materials, and Layers palettes, as well as installing and working with plugin filters. Unless I say otherwise, all 'clicks' are with the left mouse button. I have included keyboard shortcuts for the steps in parentheses ( ).
For this tutorial, you will need:
Paint Shop Pro
Animation Shop
Autumn Deco Font
Orange Spice Glitter¹
SuperBladePro²
Meadows Studio Coconut Ice SBP Preset
Marble Brush Impression³
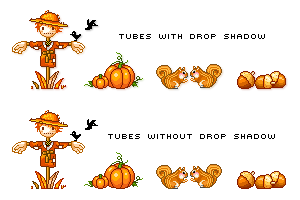
Autumn Tubes*
Notes: ¹I created the orange spice glitter in PSP using The Great Pumpkin gradient from PSP-X .com, PSP Noise, and VM Natural Sparkle, and then I animated it in AS. ²If you don't have SuperBladePro, then you can substitute Eye Candy Glass or eliminate those steps altogether. I like the Coconut Ice applied to the glitter, because it gives it a glassy look without distorting the glitter pattern. ³I created the marble brush impression with the Marble1 brush that came with PSP8. *These are the autumn tubes that I've used in the tutorial header and in my finished signature, but you can use whatever autumn tubes that you like. I have added a drop shadow to the first set of tubes, but I've also included a set for you to add a different drop shadow if you like. |
1. Extract the three Coconut Ice files (M_white_texture, M_white_pic, M_coconutice.q5q) to the Environments and Textures folder of your SuperBladePro folder.
Open PSP and Animation Shop (AS).
Open the font and minimize it to the taskbar. |
2. In AS, open the tbt_glitter_orangespice01_.gif file.
Select all the frames and copy.
Edit > Select All (Ctrl+A)
Edit > Copy (Ctrl+C)
In PSP, paste the frames as separate images.
Edit > Paste > AS Animation as Multiple Images*
*If your PSP doesn't have this option in the Edit menu, then copy each of the three frames of the glitter and paste them separately into PSP. |
3. Create a new image.
File > New (Ctrl+N)
Width=500 Pixels
Height=200 Pixels
Resolution=72.000 Pixels/inch
Raster Background
Color Depth=16 Million Colors (24 bit)
Color=#FFFFFF |
| Create the Text |
4. Load the Text Tool (T) and apply these settings* (all other settings on the toolbar should be default settings).
Create as=Vector, Font=Autumn Deco, Size=75, Stroke=0, Anti-alias=checked.
*If you're using PSP 10/11/12, your text size is rendered differently than mine, so instead of using size 75, try size 100. |
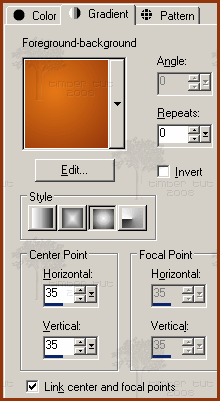
5. Set the materials for the text.
Foreground Color=#E67816
Background Color=#92350B
Foreground Style=Gradient (Foreground-Background Gradient: Style=Sunburst, Repeats=0, Invert=unchecked, Link center and focal points=checked, Horizontal=35, Vertical=35).
screenshot
Set the Background Material the same as the Foreground. |
6. Turn on the [Caps lock] key, click on the canvas and type your text, then click Apply.
Objects > Align > Center on Canvas |
7. Duplicate the text layer.
Layers > Duplicate
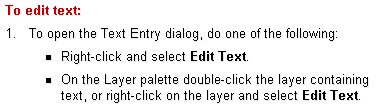
Edit the duplicate text layer.
On the Text Toolbar, set the Stroke value to 1.7 (set it to 2 if you can't set a decimal value), set the Background Material to Transparent/Null (this will create an outline for the text), and then click Apply. |
8. Make the original text layer active* then select it and convert it to a raster layer.
Selections > From Vector Object
Layers > Convert to Raster Layer
It's easier to see which of the two vector layers is active if you expand the layers on the Layer palette. Click the plus sign (+) next to the layer. The active layer will be in bold text. |
9. Add a new raster layer and name it "1".
Layers > New Raster Layer
Now add two more raster layers and name them "2" and "3". |
10. Load the Flood Fill Tool (F).
Set the Foreground Style to Pattern and load the third orange spice glitter image.
Flood fill layer 3 with the foreground pattern. |
11. Apply the SuperBladePro Coconut Ice preset.
Effects > Plugins > Flaming Pear > SuperBladePro
Click the Open Settings button  and choose M_coconutice.q5q from the list of presets. Click Open. Click OK. and choose M_coconutice.q5q from the list of presets. Click Open. Click OK.
Adjust > Sharpness > Sharpen
11a. If you don't have SuperBladePro, then you can add an inner bevel and then apply a glass filter like Eye Candy 3.1 or Eye Candy 4000. See the end of the tutorial here for the alternate settings for this step using Eye Candy 4000. |
12. Hide layer 3.
Make layer 2 active.
Flood fill layer 2 with the second orange spice glitter image, then repeat step #11. |
13. Hide layer 2.
Make layer 1 active.
Flood fill layer 1 with the first orange spice glitter image, then repeat step #11.
Selections > Select None (Ctrl+D) |
14. Make the text layer active and add a drop shadow of your choice.
Effects > 3D Effects > Drop Shadow
For my text, I added two drop shadows to the text layer. The first drop shadow settings that I used are Vertical=1, Horizontal=1, Opacity=100, Blur=3, Color=Foreground Color. For the second drop shadow, I used the same settings except I changed the Color to the Background Color, and I changed the Opacity to 50. |
| Add the Blurred Marble Background |
15. Add a new raster layer and send it to the bottom of the layer palette.
Layers > New Raster Layer
Layers > Arrange > Send to Bottom |
16. Open ADSTut_MarbleBrush.png and copy it.
Edit > Copy (Ctrl+C)
On the working canvas, paste it as a new selection.
Edit > Paste > Paste As New Selection (Ctrl+E)
Center the brush impression under the first letter of your text and click to place. Now paste another impression (Ctrl+E) under the second letter of your text, but instead of centering the impression, offset it vertically either higher or lower than center. Continue to paste the impression under each letter of your text and stagger the placement in a zigzag pattern.
Selections > Select None (Ctrl+D) |
17. Apply a motion blur.
Adjust > Blur > Motion Blur
Angle=44.00
Strength=50% |
18. Center the layer on the canvas.
If you're using PSP7, you can center the layer on the canvas by first copying the layer (Ctrl+C), then deleting it (Delete), and then pasting it as a new layer (Ctrl+L).
If you're using PSP8 (or a newer version of PSP), you can run the CenterLayer script. I have this script assigned to one of my Bound Scripts, so it makes it easy to center a layer at any time without having to search for the script and then run it. |
19. Darken the blurred marble background (optional).
If you think the background is too light, then you can darken it by duplicating the layer and then adjusting the opacity slider for that layer until you are satisfied.
I like the subtle background, so my tutorial header and finished example at the end of this tutorial will omit this step. But I have added the instruction here for those who may want a more dramatic background for their tag. |
| Decorate the Text with Autumn Tubes |
20. Open ADSTut_Tubes.
Load the Freehand Selection Tool  and reset it to default settings. Draw a selection around one of the tubes (either with the drop shadow or without). and reset it to default settings. Draw a selection around one of the tubes (either with the drop shadow or without).
Float the selection to make sure that no pixels from another tube were selected.
Selections > Float (Ctrl+F)
Copy the selection then paste it onto the working canvas as a new layer.
Edit > Copy (Ctrl+C)
Edit > Paste > Paste As a New Layer (Ctrl+L)
Bring the layer to the top of the Layer palette.
Layers > Arrange > Bring to Top
Position the tube with the Move Tool (M). |
21. Load the Freehand Selection Tool again and draw a selection around another one of the tubes, float the selection, and then copy it.
On the working canvas, paste it as a new layer.
Position the tube with the Move Tool (M). |
22. Repeat step #21 to add the remaining tubes to your working canvas.
On the working canvas, paste it as a new layer.
Position the tube with the Move Tool (M). |
| Animate the Text |
23. Hide the Background layer, then copy the merged image and paste in Animation Shop as a new image (this will be the first frame [F:1] of the text animation).
Edit > Copy Merged (Ctrl+Shift+B)
In AS: Edit > Paste > As New Animation (Ctrl+V) |
24. Back in PSP, hide layer 1 and unhide layer 2. Copy the merged image and paste in AS after the current frame (this will be the second frame [F:2] of the text animation).
Edit > Copy Merged (Ctrl+Shift+B)
In AS: Edit > Paste > After Current Frame (Shift+Ctrl+L) |
| 25. Back in PSP, hide layer 2 and unhide layer 3 then repeat the copy merged and paste commands from step #34 (this will be the third frame [F:3] of the text animation). |
26. Select all the frames of the animation and change the display time to 15.
Edit > Select All (Ctrl+A)
Animation > Frame Properties (Alt+Enter) |
| Crop and Save the Animation |
27. Crop the animation by double-clicking on the Crop icon on the Tool Palette.
Choose "Surround the opaque area" and click OK.
Double-click within the crop square to crop (or press the Crop button). |
28. Save the animation.
File > Save As (F12)
Click the Customize button.
Click the Colors tab and choose these settings.
Number of Colors=255 colors
Create palette by: Optimized Median Cut
Reduce colors by: Error Diffusion
Click the Optimizations tab and place a checkmark in these three boxes.
Write Minimal Frames
Collapse Identical Frames
Map Identical Pixels to Transparent
Click the Partial Transparency tab and choose these settings.
Convert pixels less than=1
Yes, blend with this color; color=#FFFFFF
Click OK.
Click Next.
Click Next.
Click Next.
Click Finish.
YOU'RE DONE!!!
 |
| Variations |
For this example, I have added the words "Welcome Autumn!" to my tag.

I have used the font, Bickley Script LET Plain: 1.0, size 26, stroke=0.2. For the Foreground and Background Patterns, I used the orange spice glitter images.
I have created a file with this same text (both with and without the exclamation point and with and without a drop shadow). If you would like to add this text to your tag, click here and save the png file to your computer. After step #22, open this file in PSP and select around the size that you want to use with the Freehand Selection Tool (just like you did with the autumn tubes), float the selection, copy it, and then paste it as a new layer on your working canvas. Then position the text with the Move Tool. Continue at step #23. |
For this example, I have added an inner bevel to each of the glitter layers
and then applied Eye Candy 4000 Glass (rather than using SuperBladePro).

These settings below can be used to substitute for the SuperBladePro step #11.
Effects > 3D Effects > Inner Bevel
Bevel=Bevel2
Width=10
Smoothness=25
Depth=4
Ambience=-20
Shininess=35
Color=#FFFFFF
Angle=135
Intensity=35
Elevation=55
Then apply Eye Candy 4000 Glass.
Effects > Plugins > Eye Candy 4000 > Glass
First reset all tab settings to factory default.
Settings > Reset to factory default (F5)
Then apply these settings to the Basic tab.
Bevel Width=6.99
Smoothness=75
Inside marquee=checked
Edge Darkening=3
Gradient Shading=0
Refraction=50
Opacity=0
Tinting=40
Glass Color=#FFFFFF
Then after applying the glass, sharpen twice.
Adjust > Sharpness > Sharpen
Adjust > Sharpness > Sharpen |
I'd love to see your results!
You can post them with the other member results
HERE |
 Post Codes
 PSP Challenges
 Smileys