You may print this out for your own personal use, but please do not rewrite, translate, e-mail out, offer any part of this on any other site, add to a CD, or claim this as your own. Your finished result is yours to do with as you please, including making tags and/or snags for others. You may offer your results wherever you wish, but you may not sell for profit. This tutorial was written by timber on January 29, 2009.
I wrote this tutorial using PSP8 and Animation Shop 3.10. For this tutorial, I am going to deviate from my normal style of tutorial writing which includes lots of screenshots and details (if a screenshot or more details are needed for any particular step, then please let me know, and I will edit the tutorial to add them). To complete this tutorial you should have a comfortable working knowledge of the Tools, Materials and Layer palettes, and the Menu options. Unless I say otherwise, all 'clicks' are with the left mouse button.
For this tutorial, you will need:
Paint Shop Pro
Animation Shop
Hearts Font
Xenofex 2 Constellation¹ Filter (optional)
Supplies:
My Layered PSP File²
Heart1 Preset Shape³
Notes: ¹I used Constellation to glitter the outline of my text, but if you don't have Constellation, then I will show you an alternate technique that will give a similar effect. ²My layered PSP file has all the layers added and named for you. ³If you don't already have a heart shape, then place this one in the folder where you keep the rest of your shapes.
|
| 1. Open PSP and Animation Shop. Open the font and minimize. |
| Create the Pattern for the Text Fill |
| 2. I'm going to teach you how to create the pattern for the text fill, but if you don't want to take the time to learn how to make this pattern, then you can get the pattern here. Save the pattern to your computer and open it in PSP (or just copy the pattern and paste it into PSP). Minimize the pattern. Skip to step #8. |
| 3. Create a New Image size 200x200 pixels with a transparent background. |
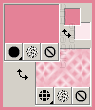
4. Set the Foreground Color to #E48297 and the Background Color to #FBE9ED. Set the Foreground Material to Gradient. Load the Foreground-Background Gradient and apply these settings (Angle: 125, Repeats: 12, Invert unchecked, Style: Linear).
 |
| 5. Load the Flood Fill Tool [F] and fill the layer with the gradient. |
| 6. Duplicate. Mirror. Rotate the layer 90 degrees to the right and then reduce the opacity to 50. Merge visible. Enhance (Effects>Edge Effects>Enhance). |
| 7. Duplicate. Rotate 90 degrees to the right. Change the blend mode to Lighten. Merge visible. This is the pattern for the text fill. Minimize the pattern. |
| Create the Text |
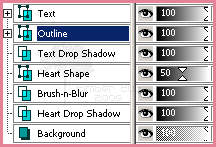
| 8. Open HeartsAglitterTut_Layers.pspimage. |
| 9. Load the Text Tool [T] and apply these settings (Create as: Vector, Font: Hearts, Size: 72*, Stroke width: 4.0, Anti-alias checked). *For PSP 10/11/12 use size 96. |
10. Change the Foreground Material to Color #E48297. Set the Background Material to Pattern. Load the pattern that you just created (or the pattern that I created for you) and apply these settings (Angle: 0, Scale: 100).
 |
| 11. Make the Text layer active. Click on the canvas, type your text and then click Apply. Center the text on the canvas. |
12. Duplicate the Text layer and then rename the Copy of Text layer "Outline". Drag the Outline layer down below the Text layer.
 |
| 13. Make the Text layer active. Edit the Text layer by first expanding the Text layer (click the + symbol next to the layer). Then click the layer with the A to make it active. Right-click on that same A layer and choose Edit Text from the fly-out menu. On the Text toolbar, change the stroke width to 0 and then click Apply. |
| 14. Select the Text layer (Selections>From Vector Object) and then Convert it to a Raster Layer. |
| 15. Make the Text Drop Shadow layer active. Add a Drop Shadow with these settings (V: 2, H: 2, Opacity: 25, Blur: 2, Color: #E48297). |
| 16. Make the Outline layer active and Convert it to a Raster Layer. Invert the selection, Float, and then Defloat. Save the selection to an Alpha Channel (we will use this selection later when we animate the text). Select None. |
| 17. Make the Text Drop Shadow layer active and apply an Offset (Effects>Image Effects>Offset) with these settings (H: 3, V: -3, Custom checked, Edge mode: Transparent). If you don't have Offset, then move the shadow image on the layer 3 pixels down and 3 pixels to the right using the Move Tool [M]. |
| Create the Heart Background |
| 18. Make the Heart Shape layer active. I've preset this layer with opacity=50. If your Heart Shape layer's opacity is anything other than 50, then go ahead and move the slider to 50. |
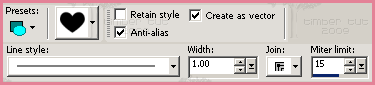
19. Load the Preset Shape Tool [P] and apply these settings (Shape: Heart1, Retain style unchecked, Anti-alias checked, Create as vector checked, Line style: Solid, Width: 1.0; Join and Miter limit should be default settings).
 |
20. Set the Foreground Material to Color #E48297 and the Background Material to Transparent (null).
 |
21. Draw out a heart shape. Center the heart shape on the canvas. Now you can edit the shape by pushing or pulling on the center handles of all sides of the bounding box until you are satisfied with the size and position of the heart shape.
 |
| 22. Select the Heart Shape layer (Selections>From Vector Object) and Convert it to a Raster Layer. |
| 23. Make the Heart Drop Shadow layer active. Add the same Drop Shadow as before but change the vertical and horizontal to 4. Select None. |
24. Make the Heart Shape layer active. Load the Magic Wand Tool [W] and apply these settings (Mode: Replace, Match mode: RGB Value, Tolerance: 0, Sample merged unchecked, Feather: 0, Anti-alias checked, Outside).
 |
| 25. Click inside the heart shape to select it. |
26. Make the Brush-n-Blur layer active. Load the Brush Tool [B]. Click the Presets drop-down menu and choose Colored Noise from the list.
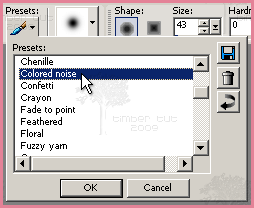
If you do not have the Colored Noise Preset, then apply these settings to the toolbar (Shape: Round, Size: 43, Hardness: 0, Step: 35, Density: 5, Thickness: 100, Rotation: 0, Opacity: 100, Blend mode: Overlay, Continuous unchecked, Wet look paint unchecked).
 |
| 27. Set the Foreground Material to Color #E48297. |
28. Click-n-drag across the selection in a zigzag motion  to speckle the selection with the foreground color. to speckle the selection with the foreground color.
 |
| 29. Apply a Motion Blur (Adjust>Blur>Motion Blur) with these settings (Angle: 44, Strength: 90). Select None. |
30. Apply an Offset. The values for the vertical and horizontal should both be negative numbers, but the numbers to use will be based on the shape and size of your heart shape. You can start with -5 and -5 and then make incremental changes to each setting until you are satisfied with the offset. If you don't have Offset, then move the blur image on the layer down and to the left until you are satisfied with the placement. For my example below, I have applied an offset of -7 and -7.
 |
| Animate the Text |
31. Add your watermark if you're going to add one.
If you'd like to create a watermark like the one I have in my finished tag below, then make the Text layer active. Add a New Vector Layer (Layers>New Vector Layer), name it Watermark, and set the Opacity to 20. Load the Text Tool [T] and change these settings (Size: 8*, Stroke: 0.0, uncheck Anti-alias, Kerning: 250). Set the Background Material to Color #E48297. *For PSP 10/11/12 use size 10.
Click on the canvas, type your text and then click Apply. Position the watermark where you like.
|
| 32. Make the Outline layer active. Load the Selection from the Alpha Channel that we created earlier in the tutorial. |
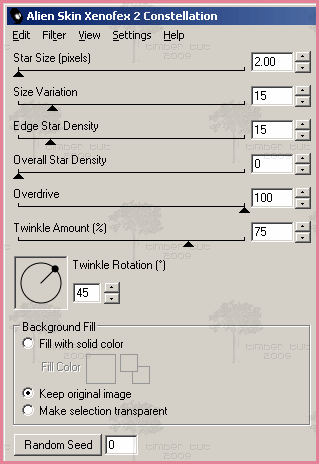
33. Apply the Xenofex 2 Constellation filter* with these settings (Star Size: 2.0, Size Variation: 15, Edge Star Density: 15, Overall Star Density: 0, Overdrive: 100, Twinkle Amount: 75, Twinkle Rotation: 45, Keep original image checked, Random Seed can be any number).
*If you do not have the Constellation filter, then I have an alternate method for you to use to create a similar constellation effect.
- Load the Brush Tool [B]. Use the same settings from step #26.
- Set the Foreground Material to Color #FFFFFF.
- Click-n-drag over the outline selection to add the white noise. The more times you go over an area of the selection the thicker the noise will be. To make it easier to see the noise that you are adding, turn off the selection marquee (Selections>Hide Marquee).
|
| 34. Select None. |
| 35. Copy Merged (Edit>Copy Merged) and Paste in AS as a New Animation [Ctrl+V]. |
36. Back in PSP, Undo [Ctrl+Z] as many times as needed to go back to the point where the outline is selected but there is no constellation (or noise) in the selection. If you hid the marquee, then you won't see the selection, but you should be able to see when the noise is gone. Add the Constellation* setting again but click the Random Seed button and then Select None.
*If you're using the "white noise" method, then brush through the selection again to add the noise and then Select None. |
| 37. Copy Merged and Paste in AS after the Current Frame [Shift+Ctrl+L]. |
| 38. Repeat steps 36 and 37. |
| 39. Crop as needed. |
40. Save the animation using these settings (Colors Tab: 255 colors, Optimized Octree, Nearest Color; Optimizations Tab: middle 3 boxes checked). If you have a Partial Transparency Tab, then use these settings (Convert pixels less than 1, Yes blend with this color #FFFFFF).
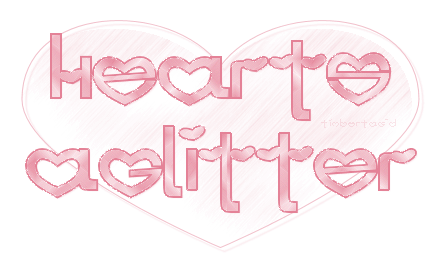
YOU'RE DONE!!!

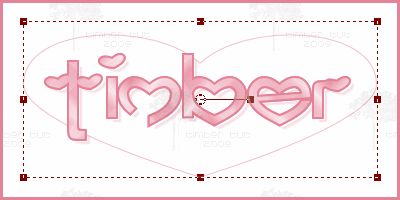
This is my finished tag using Constellation.

This is my finished tag using the Brush Tool. |
| Variations |
For this example, I used a preset shape that I created from WM St Paddys Font, letter k.

I used colors fgcolor=#73B500 and bgcolor#E6F8C4
to create the pattern fill and for the other steps in the tutorial.
I used American Uncial Font for my name. |
I'd love to see your results!
You can post them with the other member results
HERE |
 Post Codes
 PSP Challenges
 Smileys