
You may print this out for your own personal use, but please do not rewrite, translate, e-mail out, offer any part of this on any other site, add to a CD, or claim this as your own. Your finished result is yours to do with as you please, including making tags and/or snags for others. You may offer your results wherever you wish, but you may not sell for profit. This tutorial was written by timber on January 10, 2009.
I wrote this tutorial using PSP8 and Animation Shop 3.10. For this tutorial, I am going to deviate from my normal style of tutorial writing which includes lots of screenshots and details (if a screenshot or more details are needed for any particular step, then please let me know, and I will edit the tutorial to add them). To complete this tutorial, you should have a comfortable working knowledge of the Tools, Materials, and Layer palettes. Unless I say otherwise, all 'clicks' are with the left mouse button.
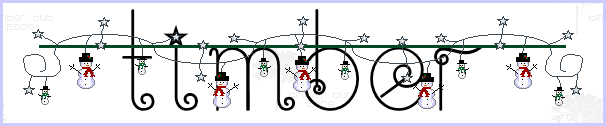
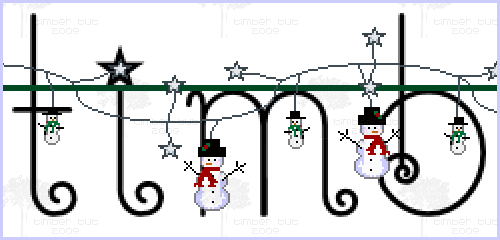
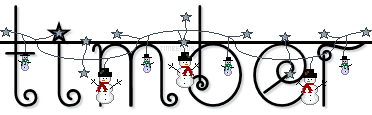
 Update July 2021: When I wrote this tutorial I had a much darker monitor and I thought the horizontal bar in the animation was black. With my new brighter monitor I can see the bar is actually dark green Update July 2021: When I wrote this tutorial I had a much darker monitor and I thought the horizontal bar in the animation was black. With my new brighter monitor I can see the bar is actually dark green   LOL. Because of this I modified the original animation to change the bar color from dark green to black. I remade the tutorial header and my sample tag at the bottom of the tutorial using the black bar animation but left all the other tutorial screenshots with the green bar. I'm including the modified animation in the supplies and editing the tutorial instructions to open the black bar animation as the tutorial was intended when I wrote it, but you can use whichever bar you prefer. I also modified the original animation to remove the bar entirely, so you may want to play with that LOL. Because of this I modified the original animation to change the bar color from dark green to black. I remade the tutorial header and my sample tag at the bottom of the tutorial using the black bar animation but left all the other tutorial screenshots with the green bar. I'm including the modified animation in the supplies and editing the tutorial instructions to open the black bar animation as the tutorial was intended when I wrote it, but you can use whichever bar you prefer. I also modified the original animation to remove the bar entirely, so you may want to play with that  . . |
For this tutorial, you will need:
Paint Shop Pro
Animation Shop
Twinkle-Fairy Font
Supplies:
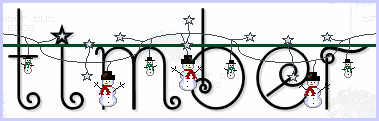
Snowman Black Bar Animation
Star Animation
Snowman Green Bar Animation*
Snowman No Bar Animation
Notes: *Thank you to debby for sharing her idea for this tag and the snowman bar animation! If you know who the creator of this animation is, then please let me know so that I can give credit. I created the star animation from the snowman bar animation. |
- Open PSP and Animation Shop. Open the font and minimize.
- In AS, open snowvillebar21-black.gif. Select all the frames of the animation [Ctrl+A] and copy [Ctrl+C].
- In PSP, paste the frames as a new image [Ctrl+V].
- Resize the canvas (Image>Canvas Size) to 600x200 pixels (placement in the center).
- Load the Text Tool [T] and apply these settings (Create as: Vector, Font: Twinkle-Fairy, Size: 125*, Stroke: 1.5, Anti-alias checked, Kerning: 100). All other settings on the toolbar should be default settings. *For PSP 10/11/12, use size 166.
- Set the Foreground and Background Colors to #000000.
- Click on the canvas, type your text using all lowercase letters, and then click Apply. Send (or drag) the text layer to the bottom of the Layer palette (Layers>Arrange>Send to Bottom).
- Move your text to the bar so that the top of the shorter letters of text touches the bottom of the bar (the "arms" of the taller letters should extend above the bar).
For display purposes, I have added a white layer to my canvas.
Zoom: 200%
Now move the text left or right as needed until you are satisfied with the horizontal placement. If you have an i in your name like I do, then you can place the text like mine so that one of the stars sits inside the "dot" of the i (this will also work for the letter j).
- Convert the text layer to a raster layer (Layers>Convert to Raster Layer).
- Add a drop shadow (Effects>3D Effects>Drop Shadow) with these settings (Horizontal: 2, Vertical: 2, Opacity: 25, Blur: 2, Color: #414D56) or whatever drop shadow settings you choose.
- Now we need to crop away the extra bar that extends to the left and right of the text. Load the Crop Tool [R]. Make sure your text layer is active and then click on the Layer Opaque button on the toolbar. This will form a crop rectangle around the text. Now adjust the crop rectangle to the left and right and top and bottom as needed to include whatever parts of the snowman bar that you'd like to include (try not to crop through a star or snowman). Then Crop.
- It is okay to have the string part of the snowman bar extending to the right and left sides of the bar like my cropped image above because we will be adding stars to the ends in AS. But if your image has any partial star or snowman pixels remaining on either side of the canvas, then you need to delete those. Select around those pixels with the Selection Tool [S] and then delete the selection on the two layers of the snowman bar. Select none.
|
Animate the Text
- Copy the merged image [Ctrl+Shift+C] and paste in AS as a new animation [Ctrl+V].
- Go back to PSP and hide the top layer of the snowman bar.
Copy the merged image and paste in AS before the current frame [Ctrl+L].
- Open snowvillebar21_star.gif. Select all the frames of the star [Ctrl+A] and copy [Ctrl+C].
- On the text animation, select all the frames [Ctrl+A] and paste the copied star frames into the selected frames [Ctrl+E]. Position the star at the end of the string on the left and click to place.
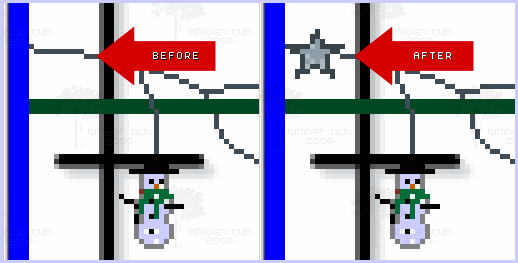
- Now paste the star into the selected frames again [Ctrl+E] but position the star at the end of the string on the right side of the bar. Click to place.
- Optional: Do you have an i, j, q, v, x, or z in your text? You may want to paste the star into the frames again and position the star over the star on those letters.
- Change the display time [Alt+Enter] of the animation to 15/100 or whatever timing you like.
- Crop as needed.
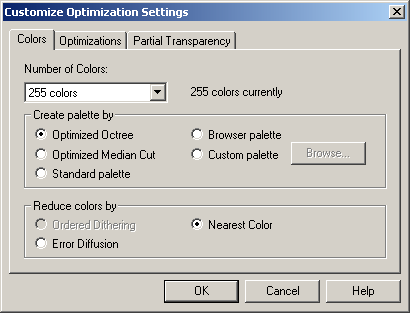
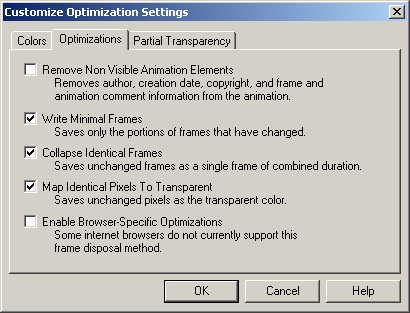
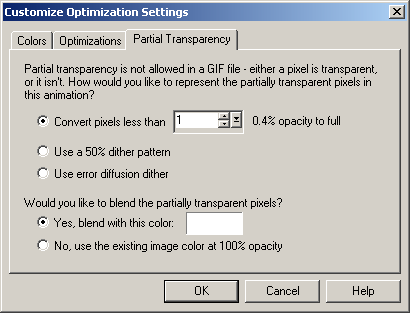
- Save the animation using these settings (Colors Tab: 255 colors, Optimized Octree, Nearest Color; Optimizations Tab: middle 3 boxes checked; Partial Transparency Tab: Convert pixels less than 1, Yes blend with this color #FFFFFF).
YOU'RE DONE!!!
I'd love to see your results! 
You can post them with the other member results HERE. |
|
 Post Codes
 PSP Challenges