
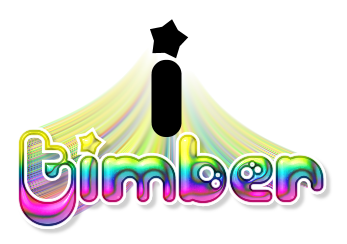
This tutorial will demonstrate how to animate a motion trail using PSP Noise. This tutorial is written in mostly my own notes and not as a formal tutorial, so you will need a comfortable working knowledge of your PSP tools, layers, palettes, etc. I will include some menu paths and screenshots, but not many.
Since I make these tags multiple times for tag offers, I create a script to make my tag making faster, so I will provide those scripts for you. You should be comfortable using scripts before trying these. As always if you run into any trouble, then just ask.
In some of the steps you will see words colored and underlined in orange to indicate those words linked to a PSP Lesson or Tip. Click those links for more information for that step of the tutorial. |
For this tutorial, you will need:
Paint Shop Pro (version 8 or higher)
Animation Shop
SuperBladePro
Meadow's Studio CoconutIce Clear Glass Preset
Eye Candy 4000 Gradient Glow and Motion Trail
Billo Font
Supplies here: place the three scripts into your Scripts-Restricted folder and the two presets into your Presets folder
tbt-BilloDiscoLoveTrail1Canvas PSP Script: for creating the canvas
tbt-BilloDiscoLoveTrail2Text PSP Script: for creating the text
tbt-BilloDiscoLoveTrail3Star PSP Script: for creating the star
Preset_InnerBevel_Chrome: inner bevel for chrome layer of text
Preset_ColorAdjustCurves_Chrome: for "chroming" the beveled text
Note: For each of the three scripts, there will be a section of tutorial steps between RUN SCRIPT and END SCRIPT. Those steps are run by the script, so you will ignore those if you're running the script. You will pick up again after END SCRIPT and complete any tutorial steps until the next RUN SCRIPT. |
Choose A Color Palette
I will be using the Disco Love color palette from COLOURLovers, but you can use another color palette of your choosing. Because of the chrome overlay on the text, the darker palettes show best.
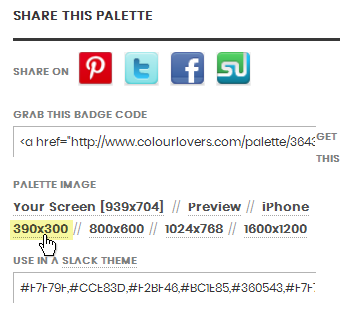
- go to COLOURLovers;
- search for "disco love" in the search box at the top of the page;
- click the "disco love by plus1pxl" palette from the results; scroll down a bit and look for the share this palette section on the left side; click the 390x300 link and save the palette to your computer;
|
Set up the Canvas
The Custom Selection settings that I have used for the script are based on the font, font size, and palette from my Sunrise 'n' Set Text Tutorial. This tag was originally supposed to be another variation for that tutorial but when I added the chrome overlay and the noisy trail, I took it into a completely different direction, so I ended up writing a new tutorial. You can run the Canvas script in Interactive Script Playback Mode and make changes to the custom selection coordinates, the gaussian blur, and the vertical offset value to create a completely different canvas. I will provide yellow-highlighted notes below for where you can make changes while running the script in Interactive Script Playback Mode.
- create a new image: 600x400px, raster background, white;
- open the color palette in PSP and paste onto the canvas as a new layer;
~RUN SCRIPT: tbt-BilloDiscoLoveTrail1Canvas
- rename "palette";
- image>rotate>free rotate: right, 90degrees, all layers UNchecked;
Rotate counter-clockwise if you would like a "flip" of the palette.
- selection tool; custom selection (L:300, T:5, R:350, B:395, use current selection as default UNchecked);
These custom selection settings are based on the color palettes from COLOURLovers with five (5) colors of even spacing. If you're using a different color palette then use values that will select the portion of the palette that you want to use for your text fill.
- gaussianblur=25;
Decrease the blur setting for more dramatic bands of color.
- copy selection; select none; hide the palette layer;
- add new layer "text fill";
- selection tool: custom selection (L:0, T:70, R:600, B:130);
These custom selection settings are based on my Sunrise 'n' Set Text Tutorial. You can experiment with the script by changing the bottom value to create a more narrow or wider selection.
- paste into selection; select none;
- duplicate; image>flip;
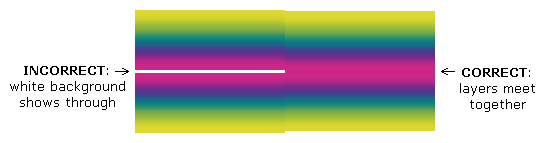
- effects>image>offset (H:0, V:140, custom, transparent);
This offset is based on the 60px custom selection made in step#9. If you created a selection different than 60px, then you will most likely need to adjust the vertical offset at this step. Adjust the vertical offset, so the two layers meet together; you shouldn't see any of the white Background showing through where the two layers meet.
- merge down; duplicate; offset (H:0, V:-120);
- merge down;
~END SCRIPT |
Create the Text
- text tool: create as vector, billo, size 72, stroke=0, anti-alias=checked;
- materials palette: FGcolor=white, BGcolor=white;
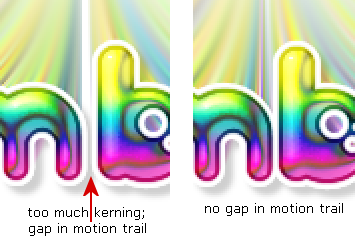
- add new vector layer name "text"; type the first letter of your name (or text) as a capital letter and the remainder of the letters as lowercase; adjust the kerning between the first and second letters;
While still in the Text Entry dialog box, select the first letter of the name (or text) and set the kerning so the first letter is evenly spaced from the other letters.
If your text has an even number of letters like my name, then pay close attention to the kerning between the two middle letters, as you may see a gap in the motion trail if the kerning is too wide. After you set the kerning and run the script, you'll see if you have a gap in your motion trail. Just undo the script, re-adjust the kerning and run the script again.
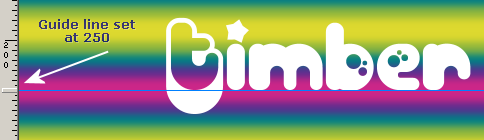
- place the text where you'd like on the canvas;
The area of the text fill layer covered by the text will be used to fill the text. For my text I have placed a guide line at 250 and placed the bottom of the text along that line.
- objects>align>horz. center in canvas
~RUN SCRIPT: BilloDiscoLoveTrail2Text
- selections>from vector object;
- text fill layer active; copy selection; hide text fill layer;
- text layer active; add new layer "ice"; paste into selection; apply superbladepro M_coconutice preset;
- add new layer "chrome" (blendmode=overlay); paste into the selection; inner bevel (chrome preset: bevel2, 10, 35, 10, 0, 75, white, 315, 40, 35); adjust>brightness and contrast>curves (chrome preset); copymerged;
Refer to step#18 of the Gold Bling Text Tutorial to see instructions for creating the curves chrome preset.
- add new layer "trail1"; paste into selection;
- add new layer "trail2"; paste into selection;
- add new layer "trail3"; paste into selection;
- noise (gaussian, 100); eyecandy4000 motion trail (direction=90, 88.34, 100, 50, smear color from edges checked); duplicate layer; merge down; send layer to bottom; hide layer;
- trail2 layer active; repeat noise, motion trail, duplicate layer, merge down, send to bottom and hide layer;
- trail1 layer active; repeat noise, motion trail, duplicate layer, merge down, and send to bottom; do NOT hide layer;
- text fill layer active; copy selection; chrome layer active;
- add new layer "outline" (blendmode=multiply); paste into selection; contract selection by 2; delete selection;
- text layer active; selections>from vector object;
- outline layer active; contract selection by 1; invert selection; gaussianblur=0.5; select none;
- text layer active; edit text: stroke=6; selections>from vector object;
- add new layer "shadow"; dropshadow (4,4,25,4,#404040); layers>arrange>move down; select none;
- outline layer active; add new vector layer "star" (linkset=1);
~END SCRIPT
You can edit>undo script at this point, place your text in a different position on the canvas, then run the script again. This allows you to see how different areas of the text fill layer will look when pasted into the text selection. |
Create the Star
- text tool: size=120, stroke=0;
If you would like a larger star, then use a larger font size.
- materials: BGcolor=black;
- star layer active; type lowercase letter 'i';
Place black 'i' so the star is at the top of the motion trail.
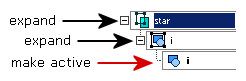
- objects>convert text to curves>as character shapes; expand the star layer to reveal the sub-layers; make the lowest 'i' layer the active layer;
- pen tool (edit mode); double-click any node of the 'i' NOT including the star;
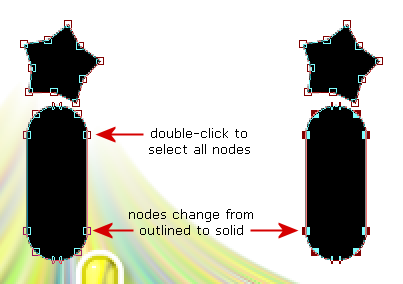
- objects>edit>delete;
Or press the delete key to delete the nodes.
- move tool; place star into position at the top of the motion trail;
The area of the text fill layer covered by the star will be used to fill the star. Unhide the text fill layer then move the star into the color zone that you want to use to fill the star. Hide the text fill layer.
Note: After you run the script you will move the star back into position at the top of the motion trail. The script will link all the star layers as a group so you can move them all-as-one with the move tool.
~RUN SCRIPT: BilloDiscoLoveTrail3Star
- selections>from vector object;
- text fill layer active; copy selection; star layer active;
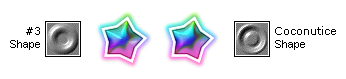
- add new layer "s-ice" (linkset=1); paste into selection; apply superbladepro coconutice (change shape to #3 or another shape of your choice);
- add new layer "s-chrome" (blendmode=overlay, linkset=1); paste into selection; repeat inner bevel and curves;
- add new layer "s-outline" (blendmode=multiply, linkset=1); paste into selection; contract selection by 1; delete selection; invert selection; gaussianblur=0.5; select none;
- star layer active; objects>properties (stroke=5, FGcolor=white, BGcolor=white); selections>from vector object;
- add new layer "s-glow" (linkset=1); eyecandy4000 gradient glow (reset to default then set: 5,50,50, draw only outside checked, color=#404040); move layer down; select none;
- magic wand tool (reset to default); s-glow layer active; click on canvas outside the glow; invert selection;
- add new layer "glow color" (blendmode=colorlegacy, linkset=1); paste into selection; select none;
~END SCRIPT
If you're not happy with the color of the star, then edit>undo script, place the star into a different position on the canvas, then run the script again.
- place watermark;
- hide background; crop; unhide background;

|
Animate the Text
- copymerged and paste into Animation Shop as a new animation;
- back in PSP, hide trail1 layer and unhide trail2; copymerged and paste in AS after the current frame;
- back in PSP hide trail2 layer and unhide trail3; copymerged and paste in AS after the current frame;
- set the display time to 11 (or whatever you like);
- Save as: median cut, error diffusion
You can experiment with the different Color tab settings, but I found that median cut and error diffusion looked best. Unfortunately some of the bright colors are eliminated in the saving process, so if you discover a way of saving this tag with less color loss, then please let me know!
 |
| Variations |
For this sample, I used the Thought Provoking Palette by Miss_Anthropy. To color the star I created a selection from the palette layer (L:300, T:5, R:350, B:395), copied the selection to the clipboard, made the star layer active and created a selection from vector object, made the text fill layer active then pasted into the selection. Then I ran the Star Script. This ensures that my star has all the colors of the color palette. It's a bit more work, but I like how the star looks with all the colors of the palette.

I can't wait to see what variations you come up with!
See member results HERE
You may offer your results wherever you wish, but you may not sell for profit.
This tutorial was written by timber on August 18, 2018. |
|
 Post Codes
 PSP Challenges
 Smileys