This tutorial will demonstrate how to create a serape-like background for text. This tutorial is written in mostly my own notes and not as a formal tutorial, so you will need a comfortable working knowledge of your PSP tools, layers, palettes, etc. I will include some menu paths and screenshots, but not many.
Since I make these tags multiple times for tag offers, I create a script to make my tag making faster, so I will provide that script for you. You should be comfortable using scripts before trying this. As always if you run into any trouble, then just ask for help. |
For this tutorial, you will need:
Paint Shop Pro (version 8 or higher)
Animation Shop
SuperBladePro
Meadow's Studio CoconutIce Clear Glass Preset
Eye Candy 4000 Motion Trail
Holy Ravioli Font or another font of choice
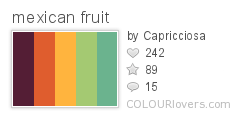
tbt-mexicanfruit Gradient or another gradient of choice
Supplies here: place the script into your Scripts-Restricted folder and the gradient into your Gradients folder
tbt-HolyRavioliSerapeText-layers Canvas
tbt-HolyRavioliSerapeText PSP Script
tbt-mexicanfruit Gradient
I created my gradient from the Mexican Fruit Palette by Capricciosa. All bands of color in the gradient are approximately the same width except for the darkest color which I narrowed and the red color which I widened.
Note: There will be a section of tutorial steps between RUN SCRIPT and END SCRIPT. Those steps are run by the script, so you will ignore those if you're running the script. You will pick up again after END SCRIPT and complete any remaining tutorial steps. The only exceptions to this is when selecting the preset for SuperBladePro and inputing the value for the Custom Selection. Those exceptions have been highlighted in the tutorial in green, so pay attention to those steps.
If you're not running the script, then follow all numbered instructions.
If you don't have the supplied canvas, then I will provide yellow-highlighted notes below for you so you can create the canvas for yourself. |
Set Up the Canvas
- In PSP, open tbt-HolyRavioliSerapeText-layers.pspimage.
If you're not using the supplied canvas, then create a new image 600x200, raster background, color=white.
- You're going to need the Rulers for the Custom Selection step, so turn them on.
View > Rulers
|
Create the Text
- Text Tool: Font=Holy Ravioli NF, size=72, stroke=4.0, anti-alias=checked, kerning=100
- Materials Palette: fgcolor=#541E35, bggrad=tbt-mexicanfruit (angle=90)
4b. If you're not using the supplied canvas, then add new vector layer name "text" and then continue with the instructions.
- text layer; type text in ALL CAPS (adjust kerning on the text toolbar as needed to bring some letters closer together like 'd', 'o' and 'y');
Note: If the canvas is not large enough for your text, then modify the width or height (Image > Canvas) as needed. If your name or text has many letters, then you may need to increase the width of the canvas or the serape background might get cut off at the edges.
~RUN SCRIPT: tbt-HolyRavioliSerapeText
- center on canvas; convert text to curves as character shapes; duplicate;
- copyotext layer; rename "coconutice";
- coconutice layer; edit object properties (change stroke=0); create selection from vector; convert to raster; SuperBladePro M_coconutice preset (change radius=60); duplicate;
- copyofcoconutice layer; blendmode=hard light;
- text layer; create selection from vector; add new layer "shadow";
- shadow layer; drop shadow (2, 2, 25, 2, black); move layer down below text layer;
- hide background/shadow/text layers; copy merged; unhide background/shadow/text layers; paste as a new layer;
- raster1 layer, rename "motion trail";
- motiontrail layer; move layer down below shadow layer; mosaic glass (65, 65, symmetric checked, 57, 2, 7, 100); select none; duplicate;
- copyofmotiontrail layer; ec4k motion trail (360, 50, 0, 100, smear color from edges checked);
- motion trail layer; ec4k motion trail (change direction=180);
At this point you could leave the two motion trail layers as they are if you'd like a thick looking "serape", but I wanted a thinner look, so I deleted a portion of each motion trail layer using custom selection.
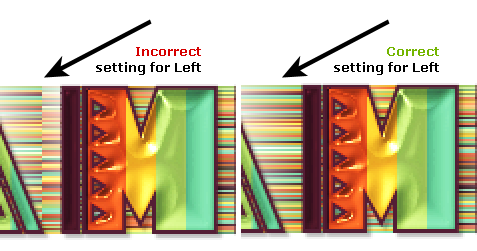
- selection tool: custom selection (L:300 or number along a vertical line of a mid letter, T:0, R:600 (or the width of the canvas), B:200, use current UNchecked); delete selection;
Note: The value you choose for the Left setting will determine where the visible break for the serape background will be, so choose a value for Left that will run vertical through a letter about mid point on the canvas.
- copyofmotiontrail layer; invert selection; delete selection; select none;
- merge down;
Note: If you would like a darker serape background, then duplicate the motion trail layer.
~END SCRIPT
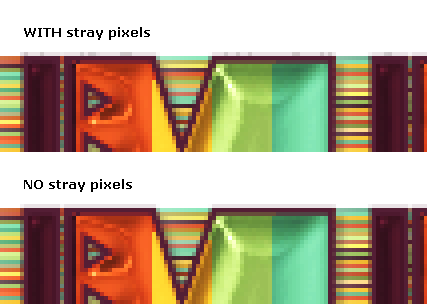
- Optional motiontrail layer: With this font you may have some stray pixels along the top edge of the text. I find the stray pixels distracting so I erase them with the Eraser Tool.

- crop;
|
Animate the Text
- coconutice layer; selection tool (rectangle, add, feather=0, anti-alias UNchecked); select around red portions of text;
- add noise (random, 50, monochrome); select none;
- copy merged and paste in AS as frame 1; back in psp, undo two times; add noise;
copy merged and paste in AS as frame 2; back in psp, undo two times; add noise;
copy merged and paste in AS as frame 3;
- save as octree, error diffusion

|
Variations

For this sample, I've used Hot Tamale Font, gradient angle=270, changed the noise from random to gaussian, and selected the light green portion to animate rather than the red.
I can't wait to see what variations you come up with!
See member results HERE
You may offer your results wherever you wish, but you may not sell for profit.
This tutorial was written by timber on April 26, 2020. |
|
 Post Codes
 PSP Challenges
 Smileys