
Please feel free to link to this tutorial and/or print it out for your own personal use, but do not copy it in any way to put online, pass out, or re-write without permission. Any resemblance to any other tuturial like this is purely coincidental.
This tutorial was originally written by timber
and re-written by Kes (Rachel) with permission May 27, 2006
What you will need for this tutorial:
Paint Shop Pro
Animation Shop
Eye Candy 3
Frigate font
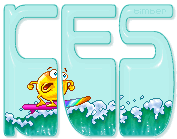
surfer gif

First, right click on the above surfer gif and save to your computer.
Open Animation Shop. Go to File > Open
and select the surfer gif.
Press CTRL A to select all of the frames
Press CTRL C to copy the frames
Open PSP (Paint Shop Pro)
Press CTRL V to paste the frames into PSP
Go to Image > Canvas Size
Change width to 500 / height 300 pixels
(make sure placement is centered)
Go to Layers > New Vector Layer
name the layer "name"
Click on your text tool and set your background color to: D4E5FB
Set your stroke color to: 398287
Set the rest of your text settings as follows:
Create As Vector
Font: Frigate / Size: 48 / Stroke Width: 1
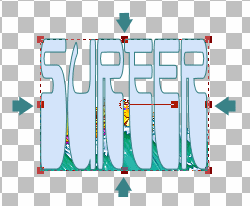
Making sure you are on the "name" layer, add your name (but do not deselect)
Go to Objects > Align > Center on Canvas
Using the nodes on the sides of your text, push your text until it is only over the gif (except for the top of your text). To keep the surfer within view, you`ll want to drag the top of your text up so that the gif is only covering the bottom part of your text. See below:
Go to Layers > Convert to Raster Layer
Select your Magic Wand tool and apply the below settings:

Click inside each letter
Go to Selections > Load/Save Selection > Save Selection to Alpha Channel
Choose a name for your selection and click Save
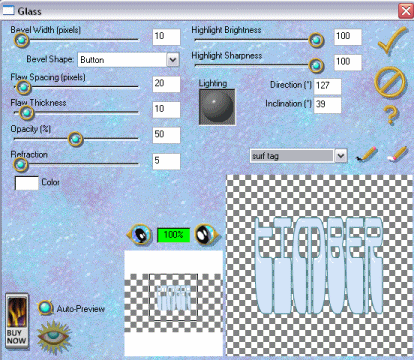
With your text still selected...
Go to Effects > Plugins > EyeCandy 3 > Glass
and apply these settings:
Deselect your text
Go to Effects > 3D Effects > Drop Shadow
V:2, H:2, Op: 25, Blur: 2, Color: 2D6769
Go to Layers > Arrange > Send to Bottom
(your "name" layer should be the very bottom layer now)
Go to Selections > Load/Save Selection > Load Selection from Alpha Channel
(click Load)
Press CTRL SHIFT I to invert your selection
On your layer palette scroll up to the top layer and select that layer. Press the Delete key on your keyboard. Select the next layer down and press Delete. Continue selecting each layer and deleting the excess gif until all layers have been done.
Go to Selections > Select None
Now you will need to crop off the unused space on your tag
(make sure you don`t crop off the drop shadow)
On your Layer palette scroll to the bottom and click on the frame right above the "name" layer
(most likely, you will already be on this layer)
Go to Layers > View > Current Only
Uncheck the "name" layer so it is also showing
Press CTRL SHIFT C to copy merged
Go to Animation Shop
Press CTRL V to paste as new animation
Go back to PSP
Hide the layer you are on (by clicking the eye or glasses, depending on your version of PSP)
Select the layer above it and unhide that layer
(you should only have two layers visible... the "name" layer and the next frame layer)
Press CTRL SHIFT C to copy merged
Go to Animation Shop
Press SHIFT CTRL L to paste after current frame
Go back to PSP
Hide the current layer you are on and select the layer above it
Press CTRL SHIFT C to copy merged
Go to Animation Shop
Press SHIFT CTRL L to paste after current frame
Go back to PSP and repeat the above steps, working your way up the layer palette until all layers have been successfully moved to Animation Shop and pasted after each new frame.
Once you have pasted your final frame into Animation Shop
Press CTRL A to select all frames
Press ALT ENTER to bring up Frame Properties
Enter 20 under Display time
Optional step: Press SHIFT ALT ENTER to bring up Animation Properties
Select Opaque and change the color to white and click OK
(this will give your animation a white background instead of a transparent background)
Go to View > Animation
If your animation looks good, then save as gif.
(If your animation is running backwards, close your animation preview and then press SHIFT R to reverse the frames. Now view your animation and it should be running in the right direction).
(pressie from timber)
I'd love to see your results!
You can post them with the other member results
HERE |
|
 Post Codes
 PSP Challenges
 Smileys