
You may print this out for your own personal use, but please do not rewrite, translate, e-mail out, offer any part of this on any other site, add to a CD, or claim this as your own. Your finished result is yours to do with as you please, including making tags and/or snags for others. You may offer your results wherever you wish, but you may not sell for profit. This tutorial was written by timber on March 16, 2012.
I wrote this tutorial using PSP8 and Animation Shop 3.10. To complete this tutorial, you need to have a comfortable working knowledge of the Tools, Materials and Layer palettes, as well as the Menu options and working with plugin filters. I expect you to know how to search the web for the needed filters and fonts. I will not be taking the time to provide screenshots, but if one is needed for clarification, then just ask me.
For this tutorial, you will need:
Paint Shop Pro
Animation Shop
Eye Candy 4000 Glass (or EC3; let me know if you need the glass settings for EC3)
Groovy Font
Colorful Lens Pattern (This pattern came with my PSP8, so you may or may not have it in your pre-installed PSP Patterns folder).
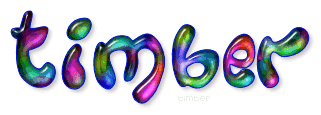
- Create a new image 500x200, white background
- Text Tool: vector, Groovy font, size=72 (or whatever you like), stroke=1, anti-alias checked
- Materials: foreground (color=#011AC6), background pattern (Colorful lens, angle=25, scale=50)
- Type text in all capital letters; center on canvas
- Create selection from vector; convert to raster layer
- Contract selection by 2
- Inner bevel: bevel2, 10, 25, 7, -20, 35, white, 135, 35, 60
- Eye Candy 4000 glass: reset to factory default; change bevel width=4.25, change color=white
- Select none
- Drop shadow: 3, 3, 25, 5, #290A0E (or whatever you like)
- Hide white background and crop as you like; leave white background hidden; copy merge
In AS...
- Paste as new animation
- Effects>insert image effect: effect=rotate colors, length=2.0, 5fps, run effect in reverse direction (you can check the box or leave it unchecked)
- Find the one frame of the animation with the display time of 10 and change it to 20
- Save as median cut, error diffusion

For my tag below, I pasted the blue text outline on top of the text in Animation Shop after applying the image effect.
And don't stop with text.
I created the image below by using a preset shape.

See Member Results HERE |
|
 Post Codes
 PSP Challenges
 Smileys
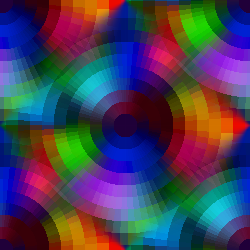