Hi Everyone! Another tutorial for you to try. Only my second, so I hope that its to your liking. There are no filters needed for this tag. Just general knowledge of PSP. I used PSP X for this tutorial.
Click here to download the supplies needed for the tut.
Tubes, patterns, mask, & Font.
1-Open a new canvas. Size 600 X 500. White background. You can crop it when we are finished. This will give you plenty of room to work.
ALTHOUGH I PREFER THIS TAG ON A BLACK BACKGROUND. You can choose that yourself. If you want black you just need to floodfill your background with black.
2-Create a new raster layer. Layer> New raster layer.
Open you diamond & gold pattern, so they will show in your patterns when you open your text tool.
3-Choose Bumper font and type out your text on the canvas Size your text to your liking depending on the size of your name. Anti-alias/ Sharp Selection/ Floating. Choose your gold pattern as your fill and your stroke set to null.
4-Now that you have your text typed out, I need you to sharpen it. To do this go to Adjust> Sharpness> Sharpen. This gives the gold a shiny effect.
Ok, now we are going to add the diamond pattern.
5-Go to Selections> Select all> Float> Defloat. We need to contract the selection so we will only be filling the big parts of the text with the diamond pattern. To do this go to Selections> Modify> Contract by 1. Depending on your text size, you may need to contract by 2. But Make sure to zoom in & ONLY click inside of the biggest spots to fill with the diamond pattern. 2 is really contracting to much unless your text is really big.lol
**TIP Zoom in on your tag so that you can see exactly what your filling**
6-Ok now that we have contracted the selection, I need you to make a new raster layer. Go to layers> new raster layer.
7-On this layer you need to click on your flood fill tool. Select the diamond pattern for your stroke. With this new layer active, we are going to click on ALL of the biggest parts of your text. Filling them all with the diamond pattern.
8-Once you have filled them all to your liking, I want you to sharpen the diamond fill. To do this, go to Adjust> Sharpness> Sharpen.
Looking pretty huh?
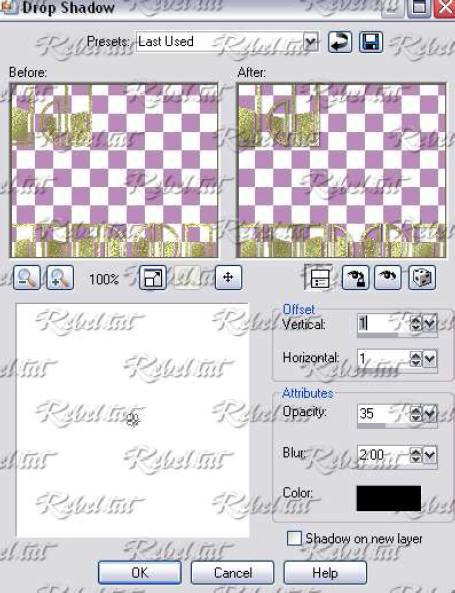
9-Now its time to add your drop shadow to your Gold Text layer, select this layer from your layer palette and apply the settings below.
10-Add your watermark at this point.
11-Ok now we are going to add the pretty lil gold elements. You can add these anywhere you like, they do not have to be exactly like mine ofcourse. Just make sure NOT to put any of them on your diamond layer, as we will be adding noise to that layer when we get ready to animate it.
Ok now that you have your gold elements on your tag the way you want them. We are going to make the gold dust effect in the background.
12-Before we do this, we need to crop off some of the image so that the gold dust will be the right size for your tag. Leave a couple inches off of the top & bottom of your text.
13-Click on the white background layer of your tag. Then go to Layers> new raster layer.
14-I want you to CLOSE all layers except for the layer you just made. The only layer that should be visible is this blank one.
15-Now... Flood fill this layer with your gold pattern. We are going to add the mask to make the gold dust background. Make sure to select "Becky_mask023"
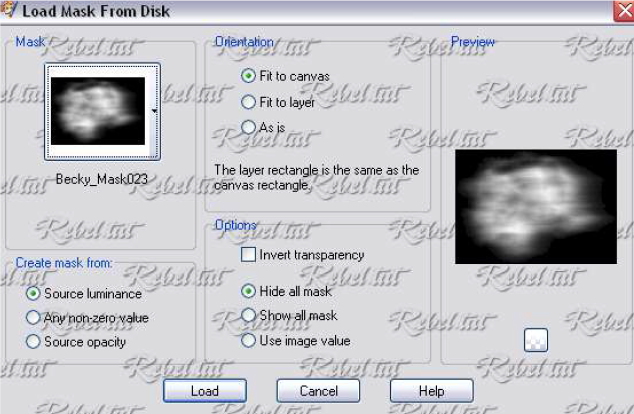
16-Once you have applied your mask. We need to merge group on the 3 layers your mask just made. Layers> Merge> Merge group.
17-Ok now that you have made that mask layer & merged it. You can go unhide all of your other layers.
18-Now I want you to look at your mask layer, if it needs resizing, adjustinguntil its behind your text to your liking. Please do that now. I usually resize mine just a tab, & move it around until I get it like I want.
19-Now that you have it where you want it.lol I want you to right click on your layer palette> go to properties> change the opacity of the gold mask layer to 40. This will lighten the gold dust some.
20-Do any other cropping you would like to do now, just MAKE SURE not to crop off any of the edges of your gold dust.
Looking pretty good huh? Ready to animate yet???
I sure hope so cause its time.lol
21-Ok, I want you click on your "Diamond" layer
(MAKE SURE THIS LAYER IS ACTIVE)
22-Now that you have your diamond layer active I want you to hit shift+D 3 times.This will give you 3 frames plus an extra should you mess up.lol
Now we are going to make your diamond shimmer!
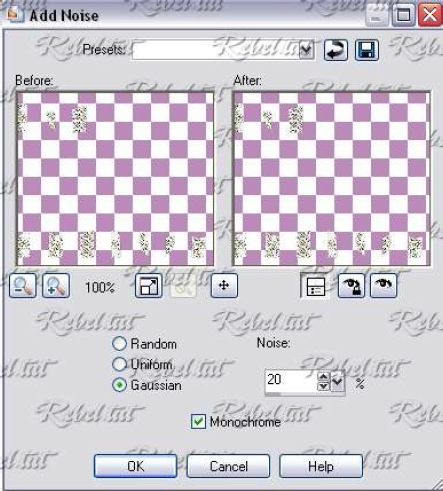
23-Ok, on your first frame I want you to go to Adjust> Add/Remove Noise & use these settings below. Once you have applied the noise, you need to merge your layers. Go to layers> Merge> Merge visible.
Ok close this one & save as Temp 1.
24-Repeat the same thing for the next 2 frames changing the noise to 22, & then the last one 24. Saving them as Temp 2 & Temp 3.
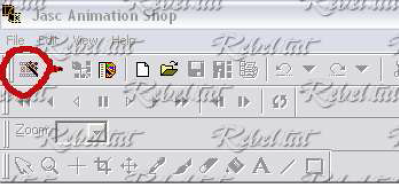
Now that we have our 3 frames we are ready for animation shop. We are going to use the animation wizard to animate our tag.
Open Animation shop. Select the animation wizard. Follow the steps below.
Same size as the first image> Next; Transparent> Next; Upper left corner of frame, with canvas color, & put a check in scale frames to fit. Next> Yes, repeat the animation. How long? 15. Next> You are going to add your images. Click add image. Find the file you saved your 3 temp files in, select each of them. Click next> Finish. Up in the tool bar, click the other little banner that says view animaton, to make sure your tag is animated right. Once you have checked that. Its time to save!!!
Woot Woot!!! Excited aren't ya...hehe
Click File> Save as> name your tag> click on customize & use the settings below.

Click ok, then just keep on clicking Next until its done saving and
Thats it! All done!!!! Wow, that was easy enough huh?
I hope that you have enjoyed my tutorial.
Thank you for giving it a try! Don't forget to post your results.
CLICK HERE to post your results.
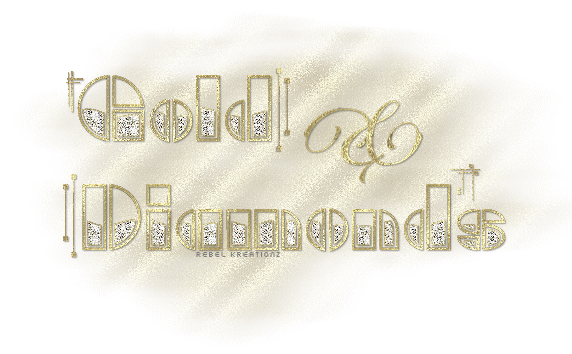
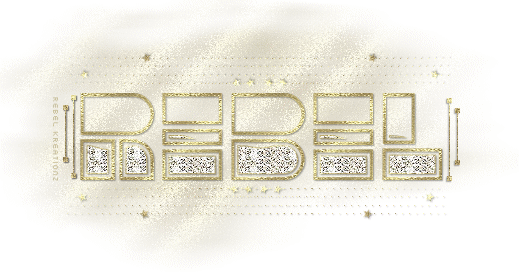
See how my tag came out?
There are so many possibilities. I used all caps for my text.
Have a great day!
xoxo
This tutorial was writtin by Rebel on October 7th, 2008.
Any similarities to another tutorial are purely coincidental!
Also the font I used, I can not find anywhere....so I am putting it in the supplies. I am assuming it is a free font. |
|
 Post Codes
 PSP Challenges
 Smileys