|
|
| De: timber (Mensaje original) |
Enviado: 09/02/2021 20:33 |
This tutorial is written mostly in my own notes and not as a formal tutorial, so you will need a comfortable working knowledge of your PSP tools, layers, palettes, etc. I will include some menu paths and screenshots, but not many.
Since I make multiple tags for tag offers, I create a script to make my tag making faster, so I will provide that script for you. You should be comfortable using scripts before trying this. As always if you run into any trouble, then just ask  . . |
For this tutorial, you will need:
Paint Shop Pro (version 8 or higher)
Eye Candy 4000 (or Eye Candy 3) Glass
Animation Shop
Supplies here:
Missy_iheartyou2 Pattern: place in the Patterns folder
Valentine's Day Font: open and minimize
tbt-ValentineGlassGlow-Red-script: place in the Scripts-Restricted folder
tbt-ValentineGlassGlow-Red-layers: open in PSP
Note: Included in the supplies are extra patterns, layered PSP canvases, and scripts to make all the color variation tags in the Variations section at the bottom. All the scripts for this tutorial are made using Eye Candy 4000, but if you need a script written using EC3, then let me know. |
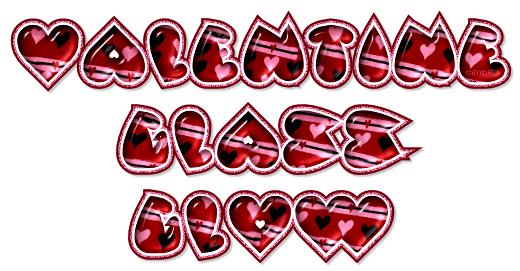
TEXT TOOL: Create as vector, Valentine's Day, size=72, stroke=0, kerning=125
MATERIALS: BGmaterial=pattern (Missy_iheartyou2, angle=11, scale=80)
Note: Complete the steps as indicated except for the steps between ~RUN SCRIPT and ~END SCRIPT. Those steps are run by the script, so you will ignore those if you're running the script. You will pick up again after ~END SCRIPT and complete any tutorial steps.
- after setting the text tool and materials, hide the palette layer;
- text layer; type text (adjust kerning as needed);
~RUN SCRIPT: tbt-script
- center on canvas; duplicate;
- layer properties (name=white); object properties (stroke=white, fill=null, width=5); convert text to curves as character shapes; move layer down; duplicate;
- layer properties (name=noise); object properties (stroke=#E083A7, fill=null, width=9); move layer down; duplicate;
- layer properties (name=outline); object properties (stroke=#890405, fill=null, width=13); move layer down; convert to raster; drop shadow (2,2,25,2, black, on new layer);
- noise layer; convert to raster; duplicate two times; add noise (uniform,50,mono); hide layer;
- copyofnoise layer; repeat noise; hide layer;
- noise layer; repeat noise;
- text layer; convert to raster; inner bevel (bevel#2, 10, 25, 7, -20, 35, white, 135, 35, 60); ec4k (tbt-Glass Preset settings here);
- new adjustment layer curves (input=50); bring to top;
- watermark layer;
~END SCRIPT
- place watermark;
- hide background;
- crop;
- copymerged;
|
Animate the Text
- in AS, paste as new animation;
- back in PSP, hide noise layer; unhide copyofnoise layer; copymerged; in AS, paste after current frame;
- back in PSP, hide copyofnoise layer; unhide copy2ofnoise layer; copymerged; in AS, paste after current frame;
- save as median cut, nearest color
 |
Variations


You may offer your results wherever you wish, but you may not sell for profit.
This tutorial was written by timber on February 9, 2021. |
|
|
|
 Primer
Anterior
2 a 4 de 4
Siguiente
Primer
Anterior
2 a 4 de 4
Siguiente
 Último
|
|
|
|
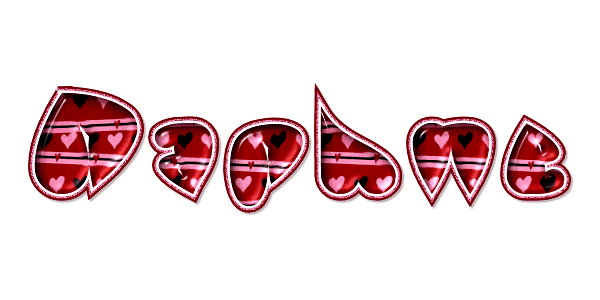
De: Daphne70 |
Enviado: 11/02/2021 01:29 |
|
|
|
|
|
Daphne, love your result! Well, I gave this a try and here is what came out from it.
The first attempt did not turn up good. I realized that the script did not work because I do not have the EC needed. And I was lost / confused with the layers - so I had to manually add the borders. That is why it looks all wonky. The glass setting I used is one that I made and shared in another tutorial.
The second attempt looks cleaner. I worked it without the script. Text as vector. Added the borders accordingly....
This is a cute / pretty tutorial. (^_^)
|
|
|
|
|
|
I am back! I wanted to try this out with a different font. This one is called Valentine One @ 92. The first one has a bg from the Carnivale text tutorial. I used one of my pixel fills and for the Noise effect, I unchecked Monochrome. It looks cute (I love the colors), I think!
For the next two, the Noise is on Monochrome. I use colors from the previous bg used, for the borders. First has Bevel+Glass (my setting). It sort of looks like it has a foil effect! And the second has Bevel+Coconut Ice. I believe I duplicated that layer and changed opacity for it (I already forgot). But it looks gorgeous! They both look really nice.
And for this last one, I used colors from the bg fill for the border. I added the Bevel effect and a new layer for the my Glass setting. I also duplicated that Glass layer. Color has been enhanced for all my results.
So, what do you all think? I enjoyed playing and I just love the glass effect. Thank you for sharing, Timber!
|
|
|
Primer
Anterior
2 a 4 de 4
Siguiente
Último
|
 Post Codes
 PSP Challenges
 Smileys