Combined Glass & Sticker Effect
*I found a tutorial on youtube SHOWING this tutorial. I've posted the link to this tutorial at the bottom of my text version of it.*
For this tutorial you'll need any version of PSP (I use version 9) and Eye Candy 4000. (You can also use Alien Skin Eye Candy 5: Impact as well if you have it and not Eye Candy 4000.)
Other Supplies: All you'll need is a font of your choice!
*YOUR TEXT*
In PSP, open up a new image. In the spoken tutorial, she has you open up a transparent image, but I prefer working on a white background. You can open up any size you want because, essentially, you can resize the canvas as needed. So, to cut down the craziness (lol), I've opened up a 600 x 600 image with a white background. My resolution is at 200.000 pixels/inch and I have it set as a raster background with 16 million colors (24 bit). Hit okay and up pops your blank canvas.
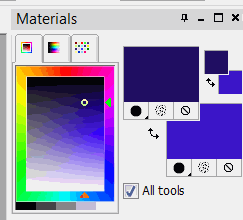
Now you get to choose the font you'd like to use! I've chosen Heavy Heap (which you can find for free at dafont). On my text tool toolbar, I have chosen (see below as well): Create as vector, Font - Heavy Heap, Size - 72, Stroke Width - 2.0, Alignment - Centered, Anti-Alias - Sharp, Line Style - Solid
(click image for full size)

You can use ANY colors you like as well. BE CREATIVE! Foreground and stroke are the OUTLINE of the letters and background and fill are what color the INSIDE of the letters are. For mine, I've chosen #200e62 for the foreground and stroke and #3c16c8 for the background and fill.
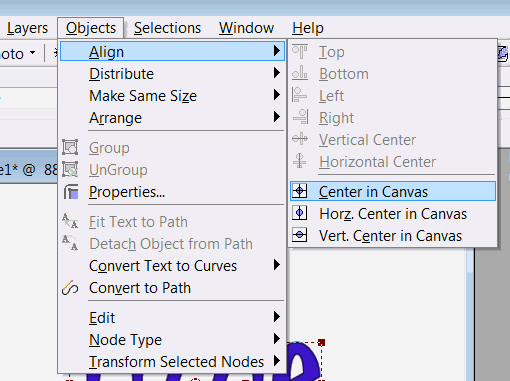
Once you have made all your choices, click on the center of the canvas and when the text entry screen pops up, type in your name and then hit apply. Then click on Objects, Align, and Center In Canvas.
*GLASS EFFECT*
1. Press Ctrl and A to select all (or click on Selections and Select All).
2. Press Ctrl and F to "float" your selection (or click on Selections and Float).
3. Click on Effects, Plugins, Eye Candy 4000, and Glass.
*On the spoken tutorial, she gives you her entries to put in here. I'm going to give you mine. Again--be creative!!*
I've combined all 3 tabs that you have on Glass on the image before. Again, these were just MY preferences.
(click for full size image)
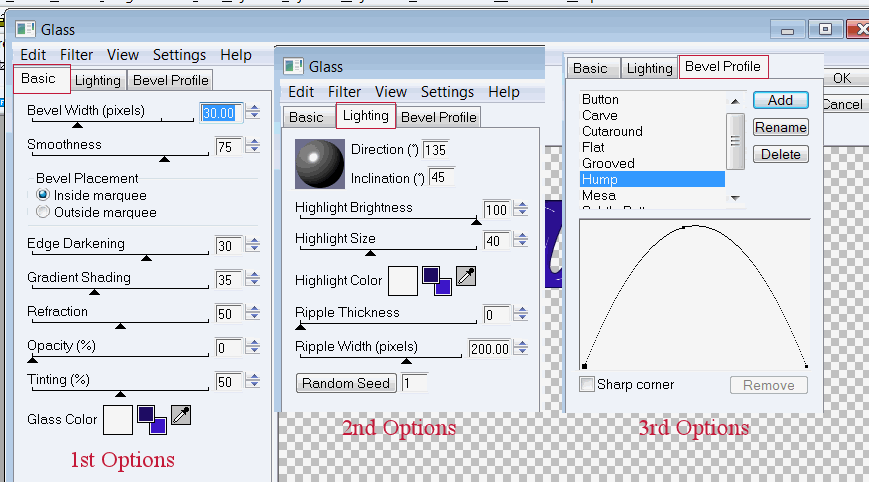
Hit Ok and you've now got your glass effect!
*Sticker Effect*
I've left my text selected after I clicked OK for the glass effect. If you've deselected it at this point, just hit Ctrl and A and then Ctrl and F once again.
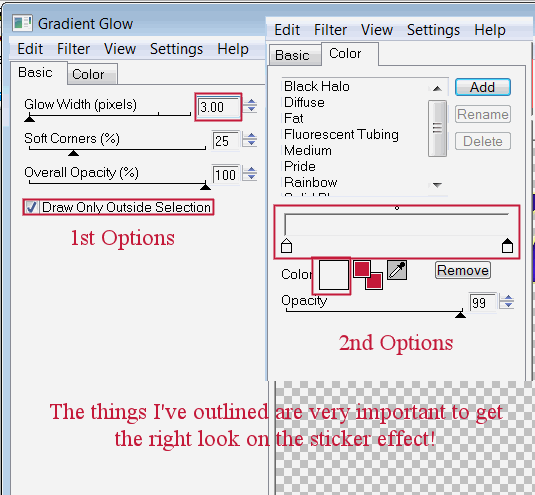
Click on Effects, Plugins, Eye Candy 4000, Gradient Glow. These choices are pretty important to get the sticker effect too look right. You can play around with them though. Again, I've just grouped together all the options for the Gradient Glow into the one image for you to see.
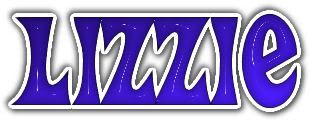
Now your text has the glass and sticker effect!
For further "punch" I've applied a drop shadow to mine. With the text still selected, click on Effects, 3D Effects, Drop Shadow. These were my choices:
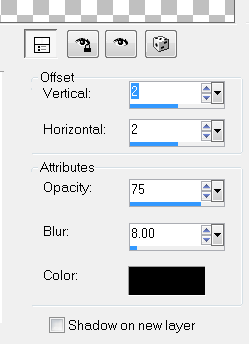
I then repeated the drop shadow but changing vertical and horizontal to -2 each. After this you can add your watermark if you have one and then crop the excess canvas and then save. This was my finished product:
*Original youtube Tutorial* |
 Post Codes
 PSP Challenges
 Smileys