|
|
| Da: timber (Messaggio originale) |
Inviato: 11/03/2009 22:51 |
Easy Suede
I've been playing with the Brush Strokes filter in the Art Media Effects lately, and I created a pattern that reminded me of suede, so I thought I'd share how I made it.

- Fill a layer with color=#A5826C. It can be a different shade but stay within the medium tones for this as dark tones don't show this very well.
*Update July 2021* With my new brighter monitor I can see this technique also works on much darker tones, so experiment with different colors (dark and light).
- Add Noise (Uniform 8% Monochrome). If you don't have monochrome noise (I think PSP7 doesn't have it), then you can use DSB Flux (8% Mix).
- Effects>Art Media Effects>Brush Strokes
Apply the Soft Blur preset.
- If you would like to create a seamless tile to use for text fill, then apply the Simple Filters Quick Tile filter. You could also use Effects>Image Effects>Seamless Tiling (default settings).
|
|
|
|
|
|
|
Da: JessieJo |
Inviato: 12/03/2009 05:16 |
 You know us so well. lol Jos and I have a fabulous collection of cowgirl hats that we have gathered over the years. Jossie's collection is awesome. She made all the bands for her hats herself, all beaded with feathers and silver. We were both very much into Cowboys, horses, silver smithing, two stepping, beer, trucks and dogs. rofl My boys are cowboys and my daughters married cowboys. Jossie's son occasionally wears his hat. especially when he's building Log Cabin homes. (he's a contractor- excuse me - was a contractor) The sign above the back door reads "If your not country..." I still get weak in the knees when I see a man in a cowboy hat, jeans and boots, getting out of his old ford truck. It's time for my night time cold medicine. Thanks again for the tut. I had fun just playing around tonight. Hugs, JessieJo |
|
|
|
|
|
Da: justjam |
Inviato: 12/03/2009 05:42 |
Thanks for the great mini tut Timber. I haven't had a chance to try it yet but, I plan on it. I love the look of your suede.
Wow, JJ, your tags are fantastic. Thanks so much for sharing your settings. I'll try these out when I get a chance.
I love western and Native American themes also. When I first met my hubby, he made hand-made custom western boots for a living. I know what you mean about a man in a hat, jeans, and boots....LOL |
|
|
|
|
|
Da: Carolann |
Inviato: 12/03/2009 14:35 |
Thanks for the tut Timber |
|
|
|
|
|
Da: justjam |
Inviato: 12/03/2009 16:35 |
This was quick and fun. The font I used is Cowboys. HERE I used color #A56435 and Timber's tut settings. I used JessieJo's bevel settings. Thanks ladies!  |
|
|
|
|
|
Da: timber |
Inviato: 12/03/2009 19:31 |
Awesome, Judy!  It's interesting to see this technique with a bevel. I never thought to add a bevel to it, but the effect is interesting! Thanks for playing and showing off what you made!  JessieJo JessieJo, I used your settings to create this font preview for Oklahoma. Below the text I've added a layer, created a rectangular selection, filled it with a very light shade of the same brown color that I used for the text. Then I applied Xenofex 2 Burnt Edges (I used whatever settings were there, so they may have been default settings). I had to play a bit with overlaying a color above this layer and the blend modes to get the shade for the paper that I wanted.  I had been wanting to play with the Burnt Edges filter for some time but never had a reason yet, so thanks for giving me the opportunity  .  p.s. I know what you all mean by a guy in a cowboy hat, jeans, boots and a truck!   |
|
|
|
|
|
Da: JessieJo |
Inviato: 12/03/2009 19:42 |
Judy that bevel looks great on that font also. I went and grabbed that font, Thank you!
When I tried the exact settings a second go around it looked different but the settings were exactly the same, weird.
They look the same for you Timber.
I love to make font previews. I just haven't had the time. I'm feeling better so I'll be off to work later today, After Jossie's son comes over and fixes the washing machine. He is great at fixing stuff. We call him "Mister Fix It". lol |
|
|
|
|
|
Da: sheryltoo |
Inviato: 20/02/2012 21:21 |
Very nice tutorial. I like that effect you got with your Oklahoma tag Timber. I thought I'd download the filter to my computer but I'm not sure it's free.
Looks like I can download a trial version. |
|
|
|
|
|
Da: timber |
Inviato: 21/02/2012 01:14 |
Thanks!  To my knowledge, Xenofex 2 is a pay filter. Some of the plugins still work in a trial version, but I don't know which ones work in Xenofex 2.  |
|
|
|
|
|
Da: SharonK |
Inviato: 29/07/2017 20:43 |
I dion't hjave the soft brush--Sharon
|
|
|
|
|
|
Da: timber |
Inviato: 29/07/2017 21:04 |
Sharon, do you mean the Soft Blur Preset? |
|
|
|
|
|
Da: SharonK |
Inviato: 29/07/2017 21:28 |
Yes. This is what is listed;
DEFAULT
FACTORY DEFAULTS
MORE SPECKLES
MORE STICKS
SPECKLES
STICKS |
|
|
|
|
|
Da: timber |
Inviato: 29/07/2017 21:43 |
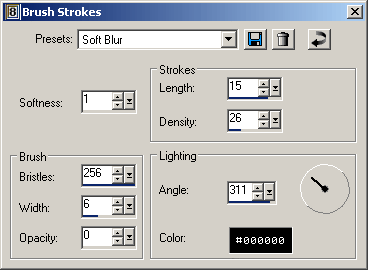
If you don't have the Soft Blur Preset, just use the settings from the screenshot. I've looked for a tutorial to show you how to save the settings as preset in your Brush Strokes menu, but I can't find one yet. I'm going to guess at the instructions for you.
- When you have the Brush Strokes dialog box open, set all the values to the same as the screenshot.
- Then click the icon that looks like a floppy disc.
- When it asks you to save it, give it the name Soft Blur.
If that works, then you have added your first preset to a menu! And if you use this preset again in the future, you won't need to add all the values by hand again, you will just select the Soft Blur from the drop-down menu. |
|
|
|
|
|
Da: SharonK |
Inviato: 30/07/2017 03:44 |
|
|
|
|
|
Da: timber |
Inviato: 30/07/2017 03:55 |
 Oh, I like that one better, thanks for showing your results! I'm glad you got the preset to work. |
|
|
|
|
|
Da: SharonK |
Inviato: 30/07/2017 04:13 |
You are a great teacher.  |
|
|
 Primo
Precedente
4 a 18 de 18
Successivo Primo
Precedente
4 a 18 de 18
Successivo
 Ultimo
|
 Post Codes
 PSP Challenges
