Página principal  |  Contacto  

Correo electrónico:

Contraseña:

Registrarse ahora!

¿Has olvidado tu contraseña?

Treehouse Treasures
 
Novedades
  Únete ahora
  Panel de mensajes 
  Galería de imágenes 
 Archivos y documentos 
 Encuestas y Test 
  Lista de Participantes
 ►► How to Join ◄◄ 
 ►Getting Started 
 Please Read 
 -:¦:--:¦:- Messages -:¦:--:¦:- 
 ♥ General 
 ♥ Daily Greetings & Checking In 
 ♥ Broken Links 
 ♥ Post Office 
 ♥ PSP Lessons 
 ♥ Chat 
  Post Codes 
  PSP Challenges 
  Smileys 
  Taggy Me 
 -:¦:-:¦:- Tag Galleries -:¦:-:¦:- 
 ♥ Artist Appreciation 
 ● Autumn 
 ▲Christmas 
 † Halloween 
 ■ Pirate 
 ╠ Steampunk 
 ♣ St. Patrick`s Day 
 :¦: Winter 
 -:¦:--:¦:-Tutorial Links-:¦:--:¦:- 
 ● Animation Shop Tuts 
 ● Autumn Tutorials 
 ● Blinkie Tutorials 
 ● Halloween Tutorials 
 ● Member Tutorials 
 ● Old School Tutorials 
 ● Text Tutorials 
 ● Christmas Tutorials 
 ►►► JUDY TUTS ◄◄◄ 
 ● Animated Filmstrip 
 ● Cutout Text 
 ● Diamond Jiggler Bling 
 ● Diver Smiley Tag 
 ● Flag Glitz Glitter 
 ● Gardenhose Tag 
 ● Glitz Glitter 
 ● Making Movies 
 ● Rainbow Motion Text 
 ● Tiny Box Smiley 
 ● Twinkle 
 ● Vector Text Node Edit 
 ● Watery Grave 
 ►►► KARLA TUTS ◄◄◄ 
 ♥ Coloring Pages: Color & Edit 
 ♥ Dazzle Doll Glitter Sig 
 ♥ Glitter Sig 
 ♥ Kamikaze Halftone 
 ♥ Mish Mash Text 
 ♥ Stellar Bling Text 
 ►►► REBEL TUTS ◄◄◄ 
 ● Chrome Bling`n Text 
 ● Gold & Diamonds 
 ►►►TIMBER TUTS◄◄◄ 
 ● Amazon Southwest 
 ● American Idol Noisy 
 ● Autumn Deco Spice 
 ● Billo Disco Love Trail 
 ● Blackout Scene Text 
 ● Carnivale Cane Text 
 ● Etched Glass Text 
 ● Gold Bling Text Revised 
 ● Groovy Text 
 ● Hearts Aglitter 
 ● Herringbone Frame 
 ● Hollywood Fireworks 
 ● Holy Ravioli Serape Text 
 ● Itty-Bitty Blinkie 
 ● Melted Candle Text 
 ● Patriot Text 
 ● Pique Glitter Drops Text 
 ● Planet X Space Text 
 ● Ribbon Candy Text 
 ● See-Through Text 
 ● Shiny Metal Stud 
 ● Snowman Bar 
 ● Sunrise `n` Set Text 
 ● Windy Halftone Text 
 ►► MEMBER TUTS ◄◄ 
 ● DrumagStudioNF Text 
 ● Glass Text 
 ● Surfer Tag Text 
 -:¦:--:¦:--:¦:--:¦:--:¦:--:¦:--:¦:--:¦:-:¦:- 
 ►►►►►►►►►►►►► 
 ● GBTRT Page 2 
 ● IBBBT Page 2 
 ● IBBBT Page 3 
 ● PTT Page 2 
 ● PXST Page 2 
 
 
  Herramientas
 
General: Tutorial Challenge: Upine by Fiona (Old School)
Elegir otro panel de mensajes
Tema anterior  Tema siguiente
Respuesta Eliminar Mensaje  Mensaje 1 de 2 en el tema 
De: timber  (Mensaje original) Enviado: 18/01/2018 23:14
Upine

This "old school" tutorial was quite easy to do. The plugin filters used are MuRa`s Meister Copies, Distort Twirl, and Eye Candy 4000 Gradient Glow. If you need any help finding filters, please let me know.

Filters: This tutorial can be completed without the Twirl or Eye Candy filters. I used my PSP Twirl filter (Effects>Distortion Effects>Twirl). The Gradient Glow is only used for the text and can be omitted as the glow effect is very subtle, or you can use Eye Candy 3 Glow.

Mask: If you have any trouble downloading the mask from 4shared, you can get it here.

tbt18timberUpineKordek


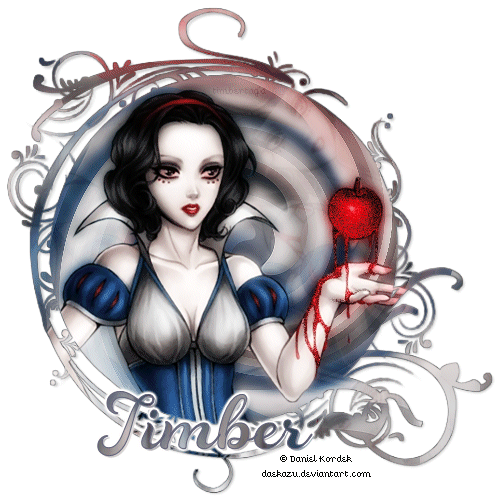
My canvas size is 500x500.

For the BG2 layer, I used PSP Twirl (Effects>Distortion Effects>Twirl: 478 Degrees. Instead of using Enhance, I used Sharpen one time.

For the tube layers, I placed both of them above the BG4 layer rather than below it. When I placed them below I had dark swirls running over the face and body and it didn`t look right.

I didn`t like how the drop shadow looked on the BG1 layer, so I "outlined" my BG1 layer first. To outline the layer, I selected it (Selections:Select All/Float/Defloat), expanded the selection by 1 pixel, loaded the Flood Fill Tool (Match mode: None, Blend mode: Paint Behind, Opacity: 100), then filled the selection with a medium dark color. The drop shadow that I added is 2/2/50/3/#404040.

For my text, I didn`t have a place inside the circular area to put my text, so I omitted those steps from the tutorial and went my own way. I chose a medium thick script font, Rosarian (you can find fonts like this at Dafont in the Script>Calligraphy section). My text has four layers: stroke, fill, drop shadow, and glow.
  1. For the stroke layer, I used a dark color with stroke=1.
  2. For the fill layer, I selected an area of BG1 to use as fill. After creating a selection of the text I pasted the fill into the selection.
  3. For the drop shadow layer, I created a "mock drop shadow" by duplicating the fill layer and moving it down below the fill layer, then offset it (Effects>Image Effects>Offset: 2, -2) and reduced the opacity to 50.
  4. My text needed something to help it stand out against the background of the mask layers, so I created a "mock gradient glow" by adding another text layer below the drop shadow layer (very light color from the tube, stroke=6). I selected this light layer, contracted the selection by 1 pixel, inverted the selection then applied a gaussian blur of 1. The blurring creates a sort of glow effect but it`s mostly done to just soften the edge of the layer so it`s not so sharp.

For animation, I added Noise to the apple and some of the red drips (gaussian, 45, mono).

The font I used for the image credit is Lilabit Px.

The Animation Shop optimization settings that I used for the Colors tab are Optimized Median Cut and Error Diffusion.


Have fun with this one; I can`t wait to see your results.


Primer  Anterior  2 a 2 de 2  Siguiente   Último  
Respuesta Eliminar Mensaje  Mensaje 2 de 2 en el tema 
De: timber Enviado: 19/01/2018 03:44
tbt18timberUpineCraigs


For this tag I used a different mask; I used WSL_Mask261 made by Chelle aka Weescotslass. Check out her wonderful masks here.

For the tube layers, I placed both tube layers above the BG4 layer for the same reason as my first tag. When I applied this mask to the tube layers it removed too much of the head and arrows, so I only applied the mask to the edges of the wings and the bottom of the body. To do this I selected around the edges of the wings and the bottom of the body and promoted the selection to a layer then deleted the selection from the tube layer. I applied the mask to the promoted layer only, merged the layer group then merged this layer down with the tube layer. I did this for both tube layers. Instead of setting the blend mode of the duplicate tube layer to Hard Light, I set it to Overlay.

I didn`t add a drop shadow to my mask layers.

For my text, I used Absurdsans FP font. I used the same light color for the fill and stroke (each on a separate layer). I set the blend mode of the fill layer to Hard Light and the blend mode of the stroke layer to Multiply.

The font I used for the image credit is Pixelette.


©2024 - Gabitos - Todos los derechos reservados