Página principal  |  Contacto  

Correo electrónico:

Contraseña:

Registrarse ahora!

¿Has olvidado tu contraseña?

Treehouse Treasures
 
Novedades
  Únete ahora
  Panel de mensajes 
  Galería de imágenes 
 Archivos y documentos 
 Encuestas y Test 
  Lista de Participantes
 ►► How to Join ◄◄ 
 ►Getting Started 
 Please Read 
 -:¦:--:¦:- Messages -:¦:--:¦:- 
 ♥ General 
 ♥ Daily Greetings & Checking In 
 ♥ Broken Links 
 ♥ Post Office 
 ♥ PSP Lessons 
 ♥ Chat 
  Post Codes 
  PSP Challenges 
  Smileys 
  Taggy Me 
 -:¦:-:¦:- Tag Galleries -:¦:-:¦:- 
 ♥ Artist Appreciation 
 ● Autumn 
 ▲Christmas 
 † Halloween 
 ■ Pirate 
 ╠ Steampunk 
 ♣ St. Patrick`s Day 
 :¦: Winter 
 -:¦:--:¦:-Tutorial Links-:¦:--:¦:- 
 ● Animation Shop Tuts 
 ● Autumn Tutorials 
 ● Blinkie Tutorials 
 ● Halloween Tutorials 
 ● Member Tutorials 
 ● Old School Tutorials 
 ● Text Tutorials 
 ● Christmas Tutorials 
 ►►► JUDY TUTS ◄◄◄ 
 ● Animated Filmstrip 
 ● Cutout Text 
 ● Diamond Jiggler Bling 
 ● Diver Smiley Tag 
 ● Flag Glitz Glitter 
 ● Gardenhose Tag 
 ● Glitz Glitter 
 ● Making Movies 
 ● Rainbow Motion Text 
 ● Tiny Box Smiley 
 ● Twinkle 
 ● Vector Text Node Edit 
 ● Watery Grave 
 ►►► KARLA TUTS ◄◄◄ 
 ♥ Coloring Pages: Color & Edit 
 ♥ Dazzle Doll Glitter Sig 
 ♥ Glitter Sig 
 ♥ Kamikaze Halftone 
 ♥ Mish Mash Text 
 ♥ Stellar Bling Text 
 ►►► REBEL TUTS ◄◄◄ 
 ● Chrome Bling`n Text 
 ● Gold & Diamonds 
 ►►►TIMBER TUTS◄◄◄ 
 ● Amazon Southwest 
 ● American Idol Noisy 
 ● Autumn Deco Spice 
 ● Billo Disco Love Trail 
 ● Blackout Scene Text 
 ● Carnivale Cane Text 
 ● Etched Glass Text 
 ● Gold Bling Text Revised 
 ● Groovy Text 
 ● Hearts Aglitter 
 ● Herringbone Frame 
 ● Hollywood Fireworks 
 ● Holy Ravioli Serape Text 
 ● Itty-Bitty Blinkie 
 ● Melted Candle Text 
 ● Patriot Text 
 ● Pique Glitter Drops Text 
 ● Planet X Space Text 
 ● Ribbon Candy Text 
 ● See-Through Text 
 ● Shiny Metal Stud 
 ● Snowman Bar 
 ● Sunrise `n` Set Text 
 ● Windy Halftone Text 
 ►► MEMBER TUTS ◄◄ 
 ● DrumagStudioNF Text 
 ● Glass Text 
 ● Surfer Tag Text 
 -:¦:--:¦:--:¦:--:¦:--:¦:--:¦:--:¦:--:¦:-:¦:- 
 ►►►►►►►►►►►►► 
 ● GBTRT Page 2 
 ● IBBBT Page 2 
 ● IBBBT Page 3 
 ● PTT Page 2 
 ● PXST Page 2 
 
 
  Herramientas
 
General: Tutorial Challenge: Etched Glass Text by timber
Elegir otro panel de mensajes
Tema anterior  Tema siguiente
Respuesta Eliminar Mensaje  Mensaje 1 de 35 en el tema 
De: timber  (Mensaje original) Enviado: 10/08/2018 00:14
Click here for the Etched Glass Text Tutorial

Click the header to go to the tutorial.

If you have any questions about this tutorial, please ask them on this thread.

And don't forget to show off your results when finished!


Primer  Anterior  6 a 20 de 35  Siguiente   Último 
Respuesta Eliminar Mensaje  Mensaje 6 de 35 en el tema 
De: timber Enviado: 10/08/2018 06:31
Karla, your text has to be in vector format, not floating or selected.  The script does all that for you.  All you need to do is type your text as vector then center on the canvas and run the script.

Here's a screenshot that I just added to the tutorial.  This is the canvas and the Layer Palette as it should look when you run the script.  Is this what your canvas/palette looked like?


Will you do me a favor and get a screenshot of the error message that you receive when you try to run the script?

The previous script that I wrote for the Blackout Scene Text used Bound Scripts that I had defined that made that script not work until I rewrote the script and only used the menu commands.  I didn't use any Bound Scripts for these scripts so I'm hoping they will work.  I will have to wait for Judy to chime in here to let me know.  I've shared scripts in the past and they've worked.

Anywho... I love your latest gothy girl tag!  I'm so happy to see doll tags again.  I haven't made one in ages, it seems, and they have been such favorites of mine.


Respuesta  Mensaje 7 de 35 en el tema 
De: justjam Enviado: 10/08/2018 06:40
Timber, I tried your tut and created my text as vector and centered in canvas. I ran the script and it ran to " name 3"  then shadow and when I clicked ok, I got this error:
 
Command could not complete because the layer is unsupported.
 
Hope this helps.

Respuesta  Mensaje 8 de 35 en el tema 
De: justjam Enviado: 10/08/2018 06:54
Here is the last screen I see:


When I click ok, I get this:


Respuesta Eliminar Mensaje  Mensaje 9 de 35 en el tema 
De: SilentEyez Enviado: 10/08/2018 07:03
Here is what I got:
 

Respuesta Eliminar Mensaje  Mensaje 10 de 35 en el tema 
De: SilentEyez Enviado: 10/08/2018 07:07

Respuesta  Mensaje 11 de 35 en el tema 
De: timber Enviado: 10/08/2018 07:12
Thank you both for the screenshots.  I'll have to look into the error messages tomorrow, and see what I can find out.

Judy, do you have a Background layer on your canvas?

Respuesta  Mensaje 12 de 35 en el tema 
De: justjam Enviado: 10/08/2018 07:20
Yes, I tried it as transparent and again  white and even renamed it background because it first showed as raster 1.
 

Respuesta Eliminar Mensaje  Mensaje 13 de 35 en el tema 
De: justjam Enviado: 10/08/2018 07:46
Timber!!   I got it to work!
 
I opened PSP and created a new image with a white background and continued with the instructions and script.  It worked! 
 
I always start with a transparent canvas and fill with white if needed.  That did not work,  but beginning with a white canvas did.

Respuesta Eliminar Mensaje  Mensaje 14 de 35 en el tema 
De: SilentEyez Enviado: 10/08/2018 09:06
Oh Judy, that must be it for me too! I always do that same too - create a new transparent image and then fill with color. I will have to try that out after I get this posted lol

Timber, hope you like this one :-)


Will play around some more with the dollies and this text! ;-)

-----------------------------------------------

I am back and I have to say I am having fun trying this effect out! Timber, I remade your tag, since I was not too convinced with the other tries (and still am not) lol Also, I tried what Judy figured out about starting off with a white canvas and it did not work for me. I will keep trying and will let you all know.


Judy, I made these for you! I tried a different font. This one is called Angie Pierced and it is also set at 85 pt. Dollie file name: s109. I used the Curacao.bmp enviro map this time.


Respuesta Eliminar Mensaje  Mensaje 15 de 35 en el tema 
De: justjam Enviado: 10/08/2018 18:36
I finally got to try this tut and after I figured out why the script wasn't working for me, I ran it like it is written.
 
 
Great tut, timber.    I love the results, but now I'm going to play around with different settings. 
 
Karla, you have really been busy!  Awesome results and TYSM for my cute new dollie tags. 

Respuesta Eliminar Mensaje  Mensaje 16 de 35 en el tema 
De: timber Enviado: 10/08/2018 21:05
Omigoodness, Judy ... you're a lifesaver.  I'm thrilled 
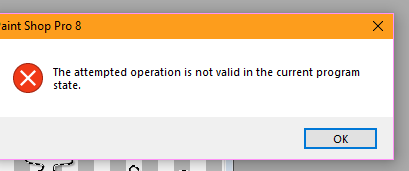
to hear that you figured out why the script didn't work for you.  I had no idea 
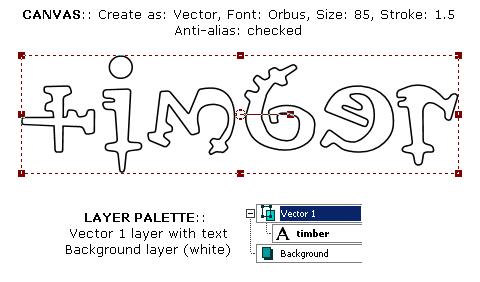
that the background layer was so important to the script running, so I will add those notes to the tutorial.  It's an instance of me thinking that everyone creates a new image with a white background like I do, so I never thought to mention it.  I suppose it's one less step than creating on a transparent background and then filling the layer with white, and apparently it creates a "background" layer rather than a raster layer; I'll add that to my memory bank as being important.

So I see you got the script to work , and your results are beautiful.  When I first made my tag I was going to make you a pressie, but I didn't know if you'd like this font .  I thought I'd share the instructions and then you can pick whichever font you would like to use , so I have to laugh to see you used the same weird font that I liked.  I have used the script on countless different fonts, and I have had difficulty finding that "Goldilocks" font that was irregular in shape and alignment.  Even my second sample font using Omikron was borderline.  I would love to see more of your results experimenting with different fonts and preset settings .

I played a little with changing the environment graphic and it seemed that the darker graphics were the most pleasing with this preset, but it's all about what pleases the eye of the tagger.

Thank you so much for trying to get the script to work for you and finding the solution!   I was so happy to see that you got it working for you .


Karla, that's one step closer to helping you get the script to work.  I create scripts all the time for tags that have many steps, and most of my text tags have lots of steps, so I like to have a script so that I can try different fonts or just to make my tag making faster.

Thanks so much for making me these gorgeous goth girly tags!   I also experimented with the Angie Pierced font, but I think it shows better on black than it did on white.  This effect really does resemble jewelry to me and it's so pretty.

I can only image the determination it takes to go through this tutorial the "long way", so good on you for that.  Maybe you have your own shortcuts for getting to the same result without going through the steps that I wrote.  I mostly wrote those steps to go in conjunction with the script, but when I tag "freestyle" then I don't usually name layers and go through the steps as written.  My tutorial writing is more methodical than my tagging style.

I've enjoyed seeing all your fab results; thanks so much for giving this tutorial a play, and thanks again for the pressies!


Respuesta Eliminar Mensaje  Mensaje 17 de 35 en el tema 
De: justjam Enviado: 10/08/2018 21:32
I was pretty excited myself when I got the script to work.   I'm not even sure why I tried the white background except, I noticed that your screenshot showed the bottom layer as "background" rather than "raster 1".
 
Here is my newest play.  I used the font Koushin and the environment bmp Curacao. 
 
I saw some other interesting bmps when I was scrolling to find this one.  I'm not finished playing yet. 
 

Respuesta Eliminar Mensaje  Mensaje 18 de 35 en el tema 
De: timber Enviado: 10/08/2018 21:51
KingthingsSpike_jos_ILIWhoa ... that's gorgeous, Judy!

I didn't realize you were such a fan of gothic fonts .  That font looks great with this effect.  I'm so happy you thought to use this font .  Thanks so much for bringing this Etched Glass preset to my attention!   And now I think I'll go make me one!

Respuesta Eliminar Mensaje  Mensaje 19 de 35 en el tema 
De: justjam Enviado: 10/08/2018 22:37
Thanks timber, yes, I do like gothic fonts, but I like lots of fonts, LOL
 
Here is my last play for a while.  This font is Kingthings Inkydinky and I used a bmp called 1d-etherealballs.
 
 
I kinda like this font also.  I want to play with different colors now but, that will be later tonight.

Respuesta Eliminar Mensaje  Mensaje 20 de 35 en el tema 
De: timber Enviado: 10/08/2018 23:04
Oh, that's lovely too, Judy!  I tried one bitmap that had sort of a golden tone to it, but it didn't look as nice as yours, and that font looks great.  Don'tcha just love Kingthings Fonts?!   They're fabby.

I gave the Koushin font and the Curacao bitmap a play, and just to change things up a bit, I added some noise (gaussian, 25, mono) to each name layer for this tag which gives it a bit more movement.

tbt18EtchedGlassKoushinCuracao


Primer  Anterior  6 a 20 de 35  Siguiente   Último 
Tema anterior  Tema siguiente
 
©2024 - Gabitos - Todos los derechos reservados