Página principal  |  Contacto  

Correo electrónico:

Contraseña:

Registrarse ahora!

¿Has olvidado tu contraseña?

Treehouse Treasures
 
Novedades
  Únete ahora
  Panel de mensajes 
  Galería de imágenes 
 Archivos y documentos 
 Encuestas y Test 
  Lista de Participantes
 ►► How to Join ◄◄ 
 ►Getting Started 
 Please Read 
 -:¦:--:¦:- Messages -:¦:--:¦:- 
 ♥ General 
 ♥ Daily Greetings & Checking In 
 ♥ Broken Links 
 ♥ Post Office 
 ♥ PSP Lessons 
 ♥ Chat 
  Post Codes 
  PSP Challenges 
  Smileys 
  Taggy Me 
 -:¦:-:¦:- Tag Galleries -:¦:-:¦:- 
 ♥ Artist Appreciation 
 ● Autumn 
 ▲Christmas 
 † Halloween 
 ■ Pirate 
 ╠ Steampunk 
 ♣ St. Patrick`s Day 
 :¦: Winter 
 -:¦:--:¦:-Tutorial Links-:¦:--:¦:- 
 ● Animation Shop Tuts 
 ● Autumn Tutorials 
 ● Blinkie Tutorials 
 ● Halloween Tutorials 
 ● Member Tutorials 
 ● Old School Tutorials 
 ● Text Tutorials 
 ● Christmas Tutorials 
 ►►► JUDY TUTS ◄◄◄ 
 ● Animated Filmstrip 
 ● Cutout Text 
 ● Diamond Jiggler Bling 
 ● Diver Smiley Tag 
 ● Flag Glitz Glitter 
 ● Gardenhose Tag 
 ● Glitz Glitter 
 ● Making Movies 
 ● Rainbow Motion Text 
 ● Tiny Box Smiley 
 ● Twinkle 
 ● Vector Text Node Edit 
 ● Watery Grave 
 ►►► KARLA TUTS ◄◄◄ 
 ♥ Coloring Pages: Color & Edit 
 ♥ Dazzle Doll Glitter Sig 
 ♥ Glitter Sig 
 ♥ Kamikaze Halftone 
 ♥ Mish Mash Text 
 ♥ Stellar Bling Text 
 ►►► REBEL TUTS ◄◄◄ 
 ● Chrome Bling`n Text 
 ● Gold & Diamonds 
 ►►►TIMBER TUTS◄◄◄ 
 ● Amazon Southwest 
 ● American Idol Noisy 
 ● Autumn Deco Spice 
 ● Billo Disco Love Trail 
 ● Blackout Scene Text 
 ● Carnivale Cane Text 
 ● Etched Glass Text 
 ● Gold Bling Text Revised 
 ● Groovy Text 
 ● Hearts Aglitter 
 ● Herringbone Frame 
 ● Hollywood Fireworks 
 ● Holy Ravioli Serape Text 
 ● Itty-Bitty Blinkie 
 ● Melted Candle Text 
 ● Patriot Text 
 ● Pique Glitter Drops Text 
 ● Planet X Space Text 
 ● Ribbon Candy Text 
 ● See-Through Text 
 ● Shiny Metal Stud 
 ● Snowman Bar 
 ● Sunrise `n` Set Text 
 ● Windy Halftone Text 
 ►► MEMBER TUTS ◄◄ 
 ● DrumagStudioNF Text 
 ● Glass Text 
 ● Surfer Tag Text 
 -:¦:--:¦:--:¦:--:¦:--:¦:--:¦:--:¦:--:¦:-:¦:- 
 ►►►►►►►►►►►►► 
 ● GBTRT Page 2 
 ● IBBBT Page 2 
 ● IBBBT Page 3 
 ● PTT Page 2 
 ● PXST Page 2 
 
 
  Herramientas
 
General: Tutorial Challenge: Picasso`s Last Word by Angie (Forum Style)
Elegir otro panel de mensajes
Tema anterior  Tema siguiente
Respuesta Eliminar Mensaje  Mensaje 1 de 7 en el tema 
De: timber  (Mensaje original) Enviado: 01/08/2021 17:02
Picasso's Last Word


When I saw this tutorial my eye was drawn to the subtle animation of the background and the weird artwork, and I wanted to know how it was made.  The "weird artwork" is made with Toadies Picasso's Last Word filter.  The hardest part of this tutorial is probably tube selection.  I tried many beautiful women tubes but the filter made them look like monsters LOL.  I suppose that's what these filter settings do, so I may have to play around with the settings for another tag.


There is one part of the tutorial where you choose a color from the tube to create the background.  I found it easier to choose a medium-light color from the Picasso layer (rather than the tube).  When you apply the Jeans filter, two colors will be created that will match the Picasso layer.  After applying the Sorting Tiles, I selected the dark areas with the Magic Wand Tool and promoted the selection to a layer and then added the drop shadow.  Angie's method and my method produce nearly identical results except that with my method the light color is the color produced by the Jeans filter and appears lighter.  I prefer the lighter color as it shows the noise effect better to my eyes .

For my font I used 2Peas Sonnets Script Light.

If you give this challenge a play, I'd love to see your creations!


Primer  Anterior  2 a 7 de 7  Siguiente   Último  
Respuesta  Mensaje 2 de 7 en el tema 
De: timber Enviado: 04/08/2021 17:34
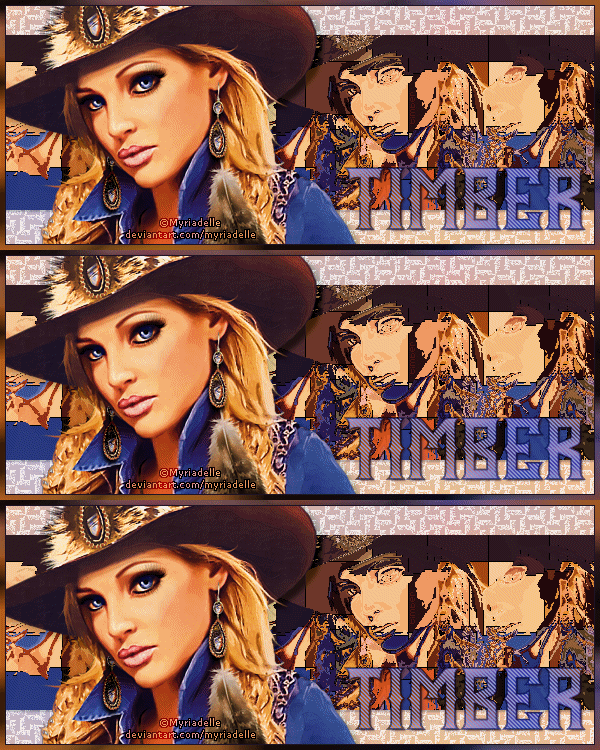
Here's another play with Picasso .


For this tag I took a very small selected portion of the Picasso layer and used it to color the Sorting Tiles layer and the text.  For the Sorting Tiles layer I pasted the selected portion into a layer above the Sorting Tiles layer and set the blend mode to Color.  I really like the soft gradient effect that it produces.

For the text, I used a blue color and applied the Jeans filter to it.  I selected the dark bands of the text and pasted that same selected portion into the selection on a layer above the text and then set the blend mode to Hard Light.  The effect reminds me of the dirty jeans of a working cowgirl LOL.

And to try something different (as I do), I animated the Sorting Tiles layer by using Mosaic Glass.  I used the default settings for three frames but changed the grout width (2, 3, 4).  It's interesting how this created a noise effect.

Oops, I nearly forgot.  I selected the earrings and added noise for that added glitz of girliness .

Respuesta  Mensaje 3 de 7 en el tema 
De: justjam Enviado: 04/08/2021 21:09
Here's my first play
 
 
This was a fun tut, timber.  Thanks for challenging us.  I love both of your results.  The first tube with the black/white/gray is gorgeous.  Thanks for sharing your variations on the tut.
 
For my tag, I used Butterfly Script font.  I added a light EC 400 gradient glow and then a lifting drop shadow.
 
 
For sure, I will be trying this again.

Respuesta  Mensaje 4 de 7 en el tema 
De: SilentEyez Enviado: 11/08/2021 21:57
Wow, love your results, gals! This was a really great tut! Though it threw me off a bit because I working as I read and I was expecting details to steps. It is very doable though! You just need some working knowledge (they are more like basic info). I will try this again, for sure! ;) 

For mine, I used a Marilyn Allen tube. The font I chose is called Moonrising. I used a 3.00 gaussian blur on a dup of my name (which was moved below original name) and lowered the opacity, to give it that slight glow.


Respuesta  Mensaje 5 de 7 en el tema 
De: Daphne70 Enviado: 12/08/2021 04:38
Just love all the work you ladies are doing... I just could not find anything to suit this tutorial , so did a similar one from the same people called   Mighty  Maze ... I am not familiar with adding a link on here maybe someone could explain that part to me as I dont understand the language ..lol   also I was a bit lost on how to add a border before finishing it as you had to add a border and then highlight your maze layer.. which was  a bit confusing to me .. 

Respuesta  Mensaje 6 de 7 en el tema 
De: SilentEyez Enviado: 12/08/2021 08:35
That looks great, Daphne! ♥ I think I will be trying that one tonight ;)

I made this one after making the first one. I wanted to post it then but I had to get off the comp and prepare lunch/dinner (I got up late lol).

I used another BAMA tube ;) For the font, I chose BigillaRegular.

I used a light gray #E0E0E0 for her "diamond ring". I created it with a circle brush tip and added some noise (Uniform, 100%, Monochrome).

For the sparkle, I implemented Judy*s Twinkle Where You Want It tut (I did it on a separate canvas). I lowered the opacity by 25% for frames #2 and #3 (100, 75, 50). I duplicated frame #2 to add it as a 4th frame. That way it gave the sparkle a nice blingy flow. ♥

She is a SNAGGIE ♥


Respuesta  Mensaje 7 de 7 en el tema 
De: ClevelandWolfe Enviado: 27/09/2022 11:40
Picasso's Last Word by Angie is a step-by-step painting tutorial for Photoshop. It was created as part of the 365 Days of Photoshop Challenge organized by Paper & Pixel. You need to get exterior house painters and learn more new tips for roof paints. This challenge runs through May 2015 and has two goals: inspire creativity and improve your digital skills via tutorials from top industry professionals.


Primer  Anterior  2 a 7 de 7  Siguiente   Último  
Tema anterior  Tema siguiente
 
©2024 - Gabitos - Todos los derechos reservados