Página principal  |  Contacto  

Correo electrónico:

Contraseña:

Registrarse ahora!

¿Has olvidado tu contraseña?

Treehouse Treasures
 
Novedades
  Únete ahora
  Panel de mensajes 
  Galería de imágenes 
 Archivos y documentos 
 Encuestas y Test 
  Lista de Participantes
 ►► How to Join ◄◄ 
 ►Getting Started 
 Please Read 
 -:¦:--:¦:- Messages -:¦:--:¦:- 
 ♥ General 
 ♥ Daily Greetings & Checking In 
 ♥ Broken Links 
 ♥ Post Office 
 ♥ PSP Lessons 
 ♥ Chat 
  Post Codes 
  PSP Challenges 
  Smileys 
  Taggy Me 
 -:¦:-:¦:- Tag Galleries -:¦:-:¦:- 
 ♥ Artist Appreciation 
 ● Autumn 
 ▲Christmas 
 † Halloween 
 ■ Pirate 
 ╠ Steampunk 
 ♣ St. Patrick`s Day 
 :¦: Winter 
 -:¦:--:¦:-Tutorial Links-:¦:--:¦:- 
 ● Animation Shop Tuts 
 ● Autumn Tutorials 
 ● Blinkie Tutorials 
 ● Halloween Tutorials 
 ● Member Tutorials 
 ● Old School Tutorials 
 ● Text Tutorials 
 ● Christmas Tutorials 
 ►►► JUDY TUTS ◄◄◄ 
 ● Animated Filmstrip 
 ● Cutout Text 
 ● Diamond Jiggler Bling 
 ● Diver Smiley Tag 
 ● Flag Glitz Glitter 
 ● Gardenhose Tag 
 ● Glitz Glitter 
 ● Making Movies 
 ● Rainbow Motion Text 
 ● Tiny Box Smiley 
 ● Twinkle 
 ● Vector Text Node Edit 
 ● Watery Grave 
 ►►► KARLA TUTS ◄◄◄ 
 ♥ Coloring Pages: Color & Edit 
 ♥ Dazzle Doll Glitter Sig 
 ♥ Glitter Sig 
 ♥ Kamikaze Halftone 
 ♥ Mish Mash Text 
 ♥ Stellar Bling Text 
 ►►► REBEL TUTS ◄◄◄ 
 ● Chrome Bling`n Text 
 ● Gold & Diamonds 
 ►►►TIMBER TUTS◄◄◄ 
 ● Amazon Southwest 
 ● American Idol Noisy 
 ● Autumn Deco Spice 
 ● Billo Disco Love Trail 
 ● Blackout Scene Text 
 ● Carnivale Cane Text 
 ● Etched Glass Text 
 ● Gold Bling Text Revised 
 ● Groovy Text 
 ● Hearts Aglitter 
 ● Herringbone Frame 
 ● Hollywood Fireworks 
 ● Holy Ravioli Serape Text 
 ● Itty-Bitty Blinkie 
 ● Melted Candle Text 
 ● Patriot Text 
 ● Pique Glitter Drops Text 
 ● Planet X Space Text 
 ● Ribbon Candy Text 
 ● See-Through Text 
 ● Shiny Metal Stud 
 ● Snowman Bar 
 ● Sunrise `n` Set Text 
 ● Windy Halftone Text 
 ►► MEMBER TUTS ◄◄ 
 ● DrumagStudioNF Text 
 ● Glass Text 
 ● Surfer Tag Text 
 -:¦:--:¦:--:¦:--:¦:--:¦:--:¦:--:¦:--:¦:-:¦:- 
 ►►►►►►►►►►►►► 
 ● GBTRT Page 2 
 ● IBBBT Page 2 
 ● IBBBT Page 3 
 ● PTT Page 2 
 ● PXST Page 2 
 
 
  Herramientas
 
General: Tutorial Challenge: Brushfinch by Lismibaebi (Forum Style)
Elegir otro panel de mensajes
Tema anterior  Tema siguiente
Respuesta Eliminar Mensaje  Mensaje 1 de 4 en el tema 
De: timber  (Mensaje original) Enviado: 06/08/2021 20:11
Brushfinch


For this tutorial you'll need MuRa's Meister Copies and Eye Candy 400 Gradient Glow.  If you don't have these filters then I'm sure you could manage without.  EC4K is used for the glow on the text, but I didn't use it; I created the "glow" on my text using the Text Tool (see notes below).

What really drew my eye to this tutorial was the wavy background.


I completed this tutorial about a week or so ago and I didn't take the time to create a document with all my notes like I usually do .  I have my layered canvas with some settings, so I'll share what I can remember .

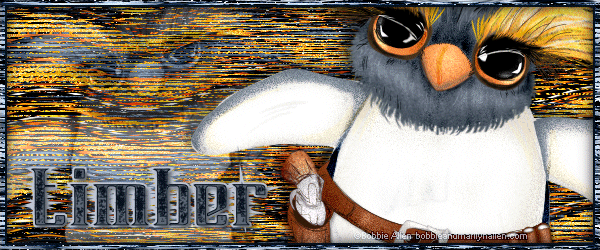
My background layer looked dull to me, so I duplicated it then changed the blend mode of the duplicate layer to hard light.  I added noise to the original background layer for animation, but I didn't record the settings.

I created a drop shadow effect on the tube by duplicating the tube layer then moving it down.  I offset the tube (-10, 10), gave it a gaussian blur of 5, then set the blend mode to multiply.  Sometimes this drop shadow effect looks good and sometimes not.  I liked it for this tag.

For my name, I used Apple Cider Aged Font.  I chose this font because it has a weathered western feel to it to match my serious-looking, gun-toting bird tube LOL.  I used a light blue for the text fill and a dark blue for the stroke (width=1).  For the glow effect, I duplicated the text layer, moved it down, then changed the stroke color to the light blue color (stroke width=5).  I created a drop shadow effect on the glow by duplicating glow layer, moving the layer down, changing the stroke width to 9, then setting the blend mode to multiply.  This gives the text a bit of lift and depth.

For the frame layer, I followed the tutorial but I didn't like it, so I promoted the background layer (5 pixels around the outside), moved it above the frame layer, then set the blend mode to luminance legacy.  I feel this frame matches the texture of the background but keeps the monochrome color of the frame.

I had fun playing with all the different blend modes to create light, dark, depth, contrast etc.  I highly recommend playing around with blend modes for your layered canvases.

If you give this challenge a play, I'd love to see your creations!


Primer  Anterior  2 a 4 de 4  Siguiente   Último  
Respuesta  Mensaje 2 de 4 en el tema 
De: justjam Enviado: 06/08/2021 23:17
 
 
This is my first try.  This is a pretty simple tut but I like the results.
 
My font is Cinnamon Roll Plain.

Respuesta  Mensaje 3 de 4 en el tema 
De: SilentEyez Enviado: 06/08/2021 23:47
Oh, Timber! That is fantastic!! L♥VE that gun toting bird lol It truly gives a western feel ;)

I saw this tutorial the other day and just like you, the background caught my eye :D So yesterday, I gave it a try BUT I sort of got confused on what she meant in the beginning.

I did fill it with just a color (at first) and it did not do anything. So I was not sure if she meant for us to create a gradient to fill the canvas with and then add the plugin. 

But because it was just red with the effect, I went ahead and created a new layer and pasted my chosen tube 2x (in middle of canvas) and then added the effect to it. It gave it the "yellow" in the background. I moved this layer below the "red" layer. And changed the "red" layer blend mode to Overlay

I added the raindrop tube that came with my PSP and changed the size to 25%. I added them on a separate layer and duplicated it. I Mirrored the duplicate for the tube on the left side of the tag. I changed the blend mode to Burn (for the normal tube on right) and I changed it to Luminance (L) for the one on left.

For the text, I used Quincho Script @ 24 pt and the dingbat is Bergamot Ornaments (I believe it was letter "w"). I typed them as Vector so that I can adjust while I work.

I have separate layers for the text - white text, red border and then pink border. And a white border for the white glow effect, which I then blurred and changed the blend mode to Luminance. *Sorry I do not remember the Stroke width for the "borders". But the red one is 5 pixels.* Did the same for the dingbat design used.

Here is my result:


I really had fun with this and it looked pretty easy to do. But mine ended up being more work because I had used a different font at first and did not add a dingbat design. It looked too plain. Even my hubby told me it needed something else lol So ... I tried another font and had to go search for a dingbat at Dafont.com. I could not get the border around text and design to look good and finally I got it to work for me and well, there you have it lol

Last but not least, the adorable tube is a BAMA creation


Respuesta  Mensaje 4 de 4 en el tema 
De: SilentEyez Enviado: 06/08/2021 23:55

Great job, Judy!!!


Primer  Anterior  2 a 4 de 4  Siguiente   Último  
Tema anterior  Tema siguiente
 
©2024 - Gabitos - Todos los derechos reservados